Tooltester is supported by readers like yourself. We may earn an affiliate commission when you purchase through our links, which enables us to offer our research for free.
I’ve been where you are. Keen on creating a website, but no idea how. Everything felt so overwhelming!
That was more than 10 years ago. Back then, it was still kind of difficult to put all the pieces together if you didn’t have any technical knowledge.
Luckily for you, it’s much easier to make a website today.
Now, before we get started with our step-by-step guide to website creation for dummies, let’s get one thing out of the way:
Do I need technical skills to make a website?
Do you need to be a computer whiz to make a website? Nope, not at all!
Sure, if you want to get really technical, you could dive into stuff like HTML, CSS, and other coding languages. But don’t sweat it if that sounds like gibberish to you.
The cool thing is you’ve got options. One of the easiest ways is to use a website builder. Think of it like using Word or PowerPoint. Just drag, drop, and you’re pretty much good to go!
These easy-to-use platforms offer a visual drag and drop editor, web hosting, and can even provide a custom domain name: truly a one-stop-shop!
Let’s get started now, shall we? Just follow these simple steps, and you will make your own website in no time!
How to set up a website in 7 steps
- Identify the type of website you need
- Decide on a platform and budget for your website (or hire someone to do it)
- Register a domain name – ideally pick a .com
- Make a plan for your website’s structure and content
- Pick a theme you like and customize it
- Add your content (text, images and other media)
- Publish and promote your website
Domain name: that’s the web address of your website. For example: mygreatwebsite.com.
URL: includes the domain name and any subpages. For example: https://mygreatwebsite.com/about
CMS: short for Content Management System. A website building platform that you can use to create, upload and publish your website. For example: WordPress and Joomla.
Website Builder: a simplified version of a CMS, usually for smaller websites. It allows easy website editing and offers predefined designs for you to choose from. It also serves as your web hosting provider. Examples: Wix and Squarespace.
Web hosting provider: a place to which you can upload your website, so other people can view it. Examples: Bluehost and Siteground.
Responsive web design: there are many different screen sizes these days (desktop computers, smartphones etc.). Responsive website templates adapt to the screen automatically and rearrange the content, so it’s readable without any issues.
Website template: website builders come with pre-designed website themes and page templates. You pick the one that’s closest to your idea or industry and adapt it to your liking (e.g. by changing images, texts, headlines etc.) when building your website.
SEO: short for Search Engine Optimization. If done right, your website will rank at the top of search engines like Google for relevant search terms. This will attract organic website visitors, which, opposed to paid traffic (e.g. via Google Ads), is completely free.
1. Identify the type of website you want to create
Websites come in all shapes and sizes. Here are the most common ones:
Type 1: Very small websites
An example of a very small website would be an online portfolio (find some examples here) or resume. These are typically used by copywriters, translators, or illustrators to showcase their work, contact information and an ‘about us’ page.
Usually these websites have around seven pages or less. It could even be a one-pager website, where you display all the information on a single page.
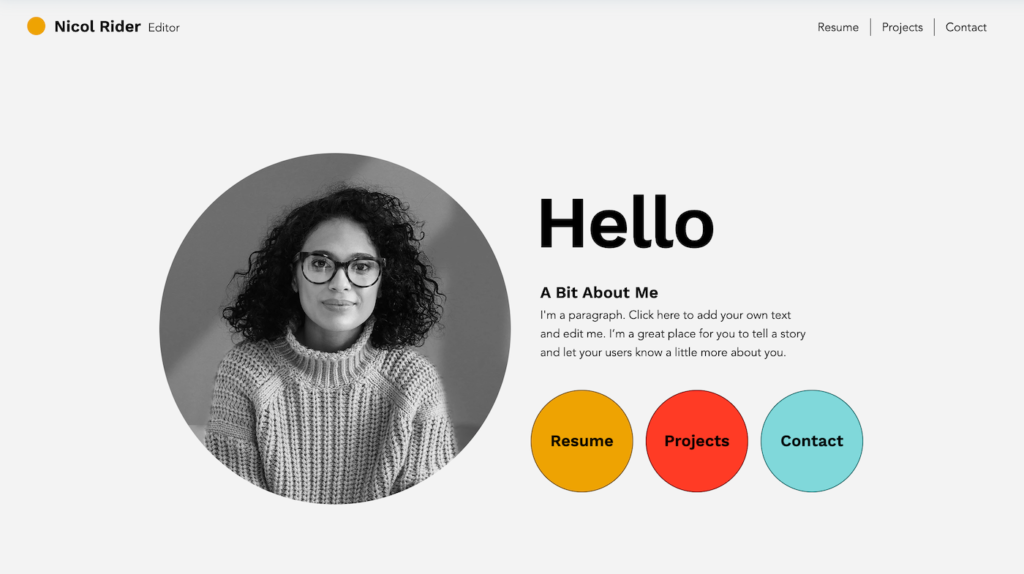
Online Portfolio template by Wix (‘Creative CV’)
This type of website doesn’t get updated much and is mostly static. You create it once, make sure everything works as it should, test the mobile version and then let it sit there. Traffic comes mostly from people directly typing in the URL or from local directories like Google Maps.
Time required: Setting up such a small website usually doesn’t take very long: a weekend should be enough for a decent-enough first version.
Ideal ways to create it: a website builder like Wix. For cheaper, slightly less powerful options, you can also check out Webnode and Strikingly.
Type 2: Blogs
If you like to share your thoughts frequently, you can also start a blog. This gives your visitors a reason to come back to your website and usually invites them to comment. Adding blog posts is usually done via a simple editor where you can upload text and images. A typical example would be a travel or food blog.

Squarespace blog template (‘Hester’)
A blog page can also be added to portfolio websites, but this has become less popular due to the rise of social media.
Time required: A small blog can easily be set up within a few days. The biggest time investment comes from posting regular content.
Ideal ways to create it: Squarespace or WordPress (there are even free blog makers)
Type 3: Slightly larger, business-focused websites
In this type of business, the website is usually an integral part of it, meaning that without the website, the business wouldn’t exit.

Shopify’s ‘Prestige’ Online Store Theme
The website might be the main marketing channel, for example:
- A food delivery service
- A membership program (e.g. online fitness course)
- A booking website for a vacation rental home
- Online consulting or coaching services
The website can even be the business:
- An Online Store
- A website comparing different products (like Tooltester.com)
- An online education website
- An online newspaper or magazine
Time required: It depends a lot on the design and functionality of your website. For example, using a website builder like Wix, you can create a site for your yoga business (incl. online appointments & payments) easily within a week, just using standard components.
However, if you want to build a bigger website with bespoke features and page templates, you will have to use a CMS like WordPress. Depending on your technical knowledge, we are now looking at a timeframe of at least a month. This will further increase if you need to hire a designer and programmer for certain tasks.
Ideal ways to create it: for regular (content)-websites, WordPress is usually a great solution. For online stores, Shopify or WooCommerce. But even Wix is worth checking out as they have many specialized apps for vacation rentals, restaurants, online bookings etc.
Smart Finder: Find your ideal website builder in 60 seconds
2. Decide on a platform and budget to build your website
After having identified the type of website you now have a clearer idea of the size of the project.
Let’s go over the most popular ways to start a professional website. There are many solutions, including website builders vs coding. Some are more flexible than others, and some are more complex.
Option 1: Setting up a website with a website builder
Let’s start with the easiest option: a website builder. This is an “all-inclusive” package, so to speak: A single platform will usually provide the following:
- The template design
- Drag and drop web editor
- Web hosting
- Domain name
- Email address
- Customer support
This isn’t only useful for beginners: it simply depends on the project. The good news is also that almost all site builders let you create a free basic website on a subdomain (e.g. yourname.sitebuildername.com). While I wouldn’t recommend using a free website professionally (since it’s ad-supported), it’s a perfect way to try it in detail before deciding if the cost is worth it.
However, if you want to take your business online, you should consider a paid plan. Prices start at around $8/month, but it includes all the essentials. Add around $1-6/month on top if you need a professional email address for your business website.
Let’s make this more concrete, though. This is how much you’d pay for an ad-free website with your own domain name:
Wix: $17/month (Light plan)
Squarespace: $16/month (Personal plan)
Hostinger Website Builder: $9.99/month (Website plan) – price goes up after your first payment term.
To better understand exactly how it works, please watch our step-by-step tutorial for website creation!
Pros:
- It’s very easy to use.
- You don’t need additional software or even a web host.
- You can start without technical knowledge.
- Updates and security aspects are handled by the website builder company.
- Predefined themes that you can adapt as you like.
- Mobile-optimized version included by default.
Cons:
- You can’t always add extra features (depending on the website builder).
- It isn’t as flexible since you’re dependent on the provider.
- They aren’t designed for very complicated projects that require a database (e.g. a job board or real-estate directories)
The most popular website builders are Wix (see tutorial), Squarespace (see tutorial), and Shopify (for ecommerce stores). You’ll find other website builders in our complete comparison. You can also check out our guide to choosing a website builder.
You can try the Wix website builder for free and for as long as you want.
- Go to the Wix website and select a template you like
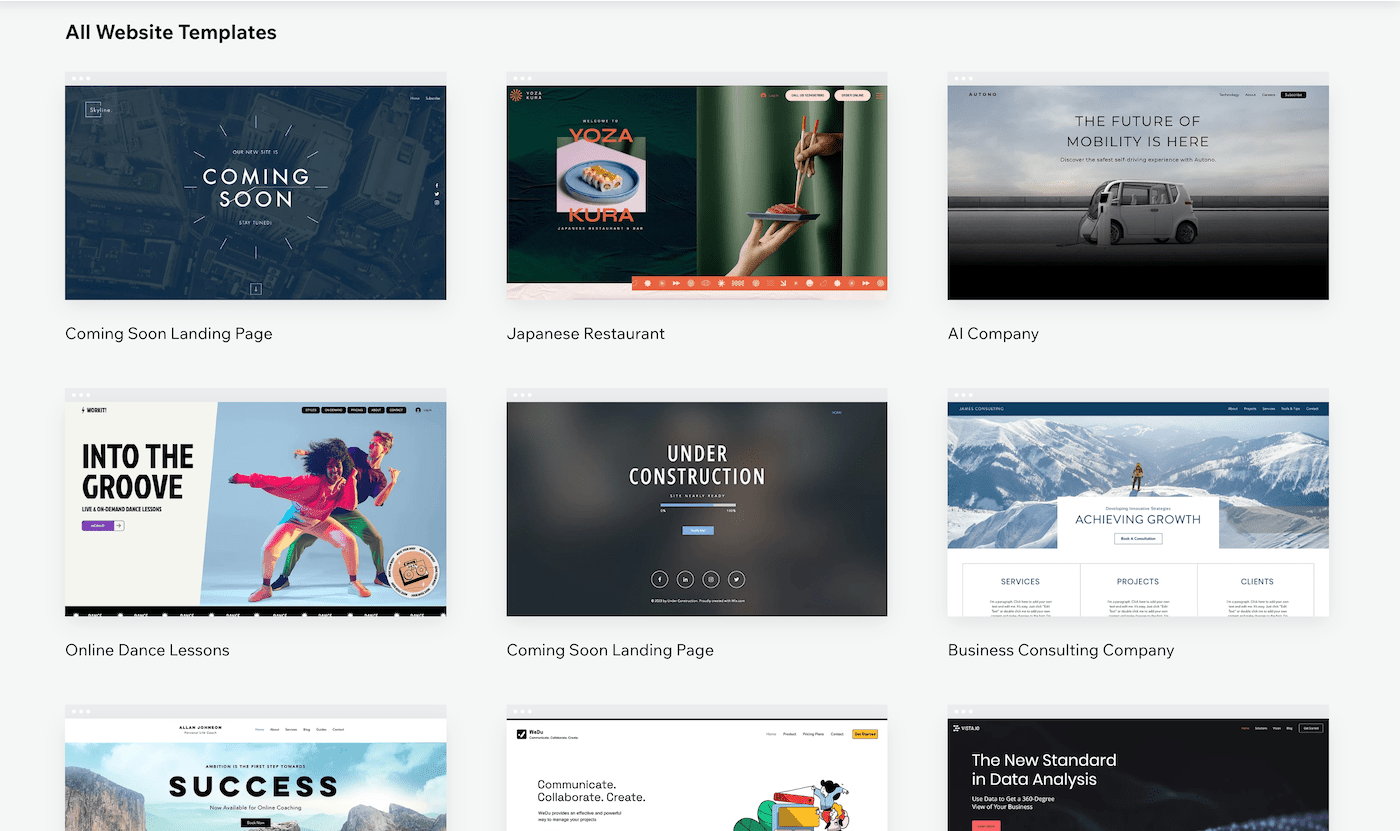
2. Click on Edit
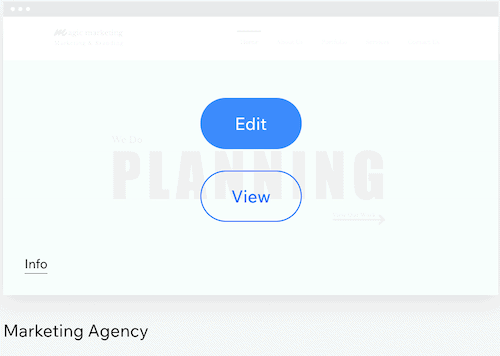
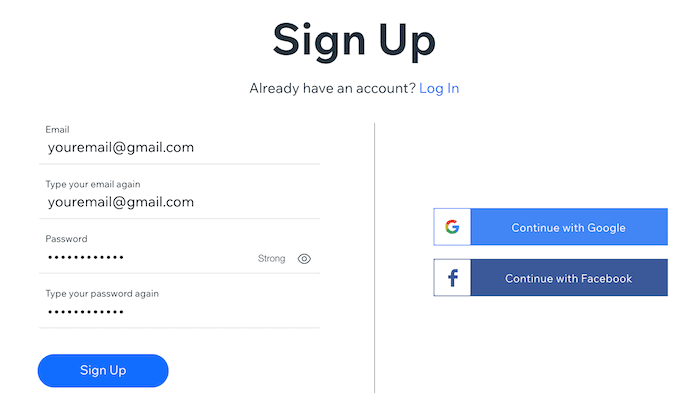
3. Sign up with your email address and choose a password (or even easier: sign up via Google or Facebook)
4. You are now in the website editor. Start replacing text and images with your own ones.
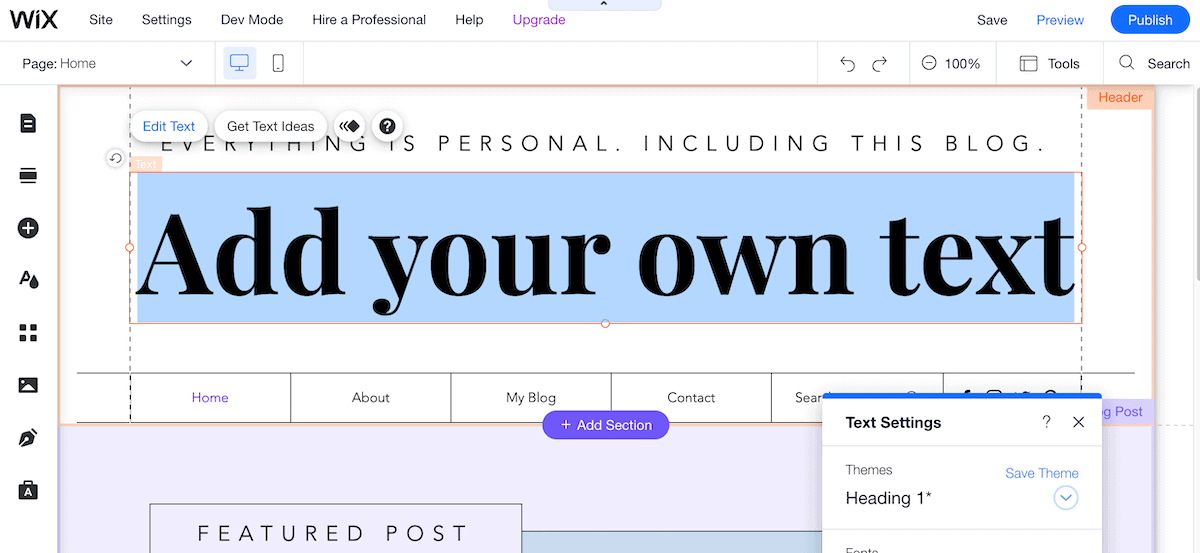
Tip: find a much more detailed Wix Tutorial here.
Option 2: Creating a website with a content management system
If you don’t want to use a website builder, you should look at content management systems (CMS). Even though they essentially work in a similar way as a website builder, they are more difficult to use.
That is because they are prepared to accommodate huge website projects (e.g. Typo3, Joomla! or Drupal). A typical user would be a larger enterprise, creating hundreds of pages while having a dedicated tech team working on the website.
Fortunately, there’s also one more CMS, which is much more accessible: WordPress. Thanks to hosting companies that offer a one-click installation, it’s not quite as difficult to set up. This is also one of the reasons why it’s the most popular CMS worldwide.
WordPress – the beginner-friendly-ish CMS
Let’s take a quick look at the pros and cons of WordPress:
Pros:
- You can freely choose the web hosting company.
- Great for multi-language websites.
- Technical flexibility: you can access the whole source code (if you know what you’re doing).
- You can get more features with plugins.
- You can optimize your page loading speed
Cons:
- No direct customer support (limited support from your web host or theme provider)
- Creative freedom depends on the template.
- Even for basic features you will need plugins that sometimes cost extra
- You may need a programmer, sometimes even to make small design changes.
WordPress Hosting
In this introductory video, we take a look at what you need to consider if you’re setting up WordPress.
You can sign up for Siteground here.
From our experience, the most recommendable hosting companies are Dreamhost (extremely affordable), Siteground (a bit more expensive but super powerful) and Bluehost (popular choice with 24/7 support). Learn more about the other cheap WordPress hosting companies we recommend. When signing up for one of these hosting companies, you can also directly register a domain name. Usually, the first year is free.
For beginners, we generally recommend Dreamhost (see our review). Considering the quality of their hosting, it’s very fairly priced. And most importantly, it includes great customer support and daily backups, which is both essential in case something goes wrong. This way, you can roll back your website to a previous state effortlessly.
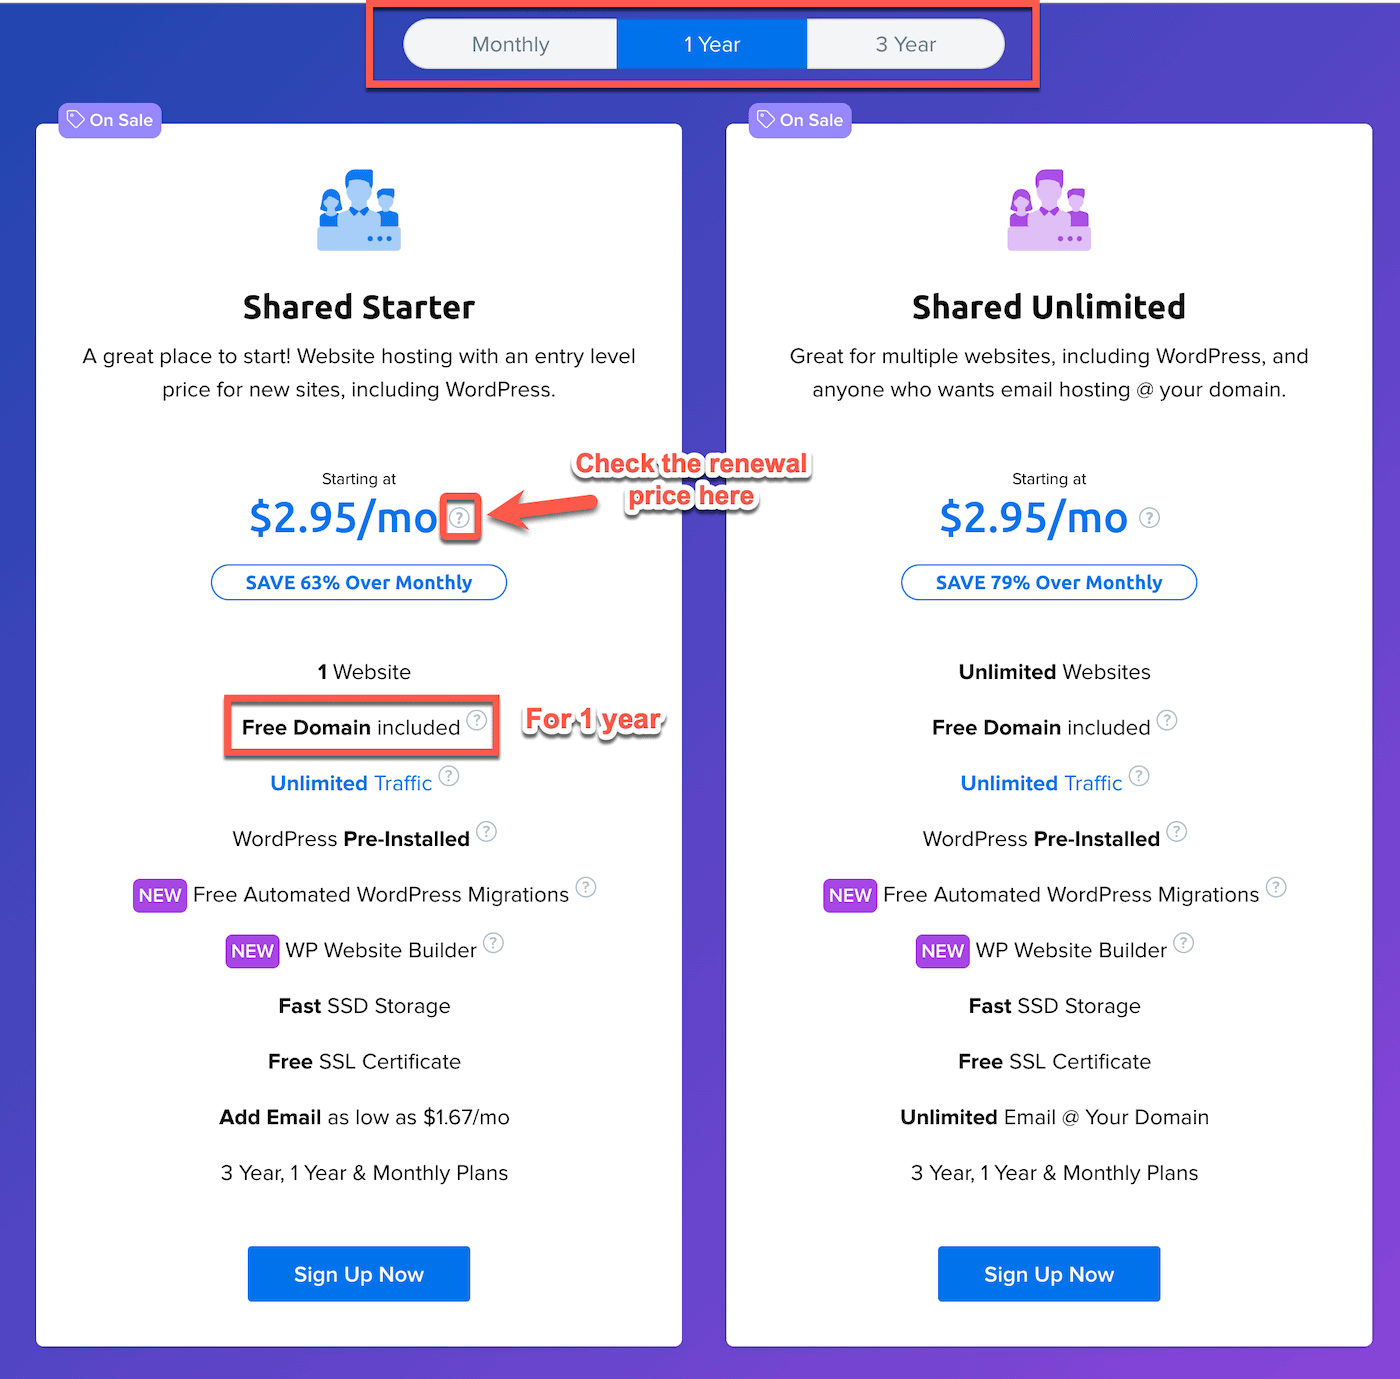
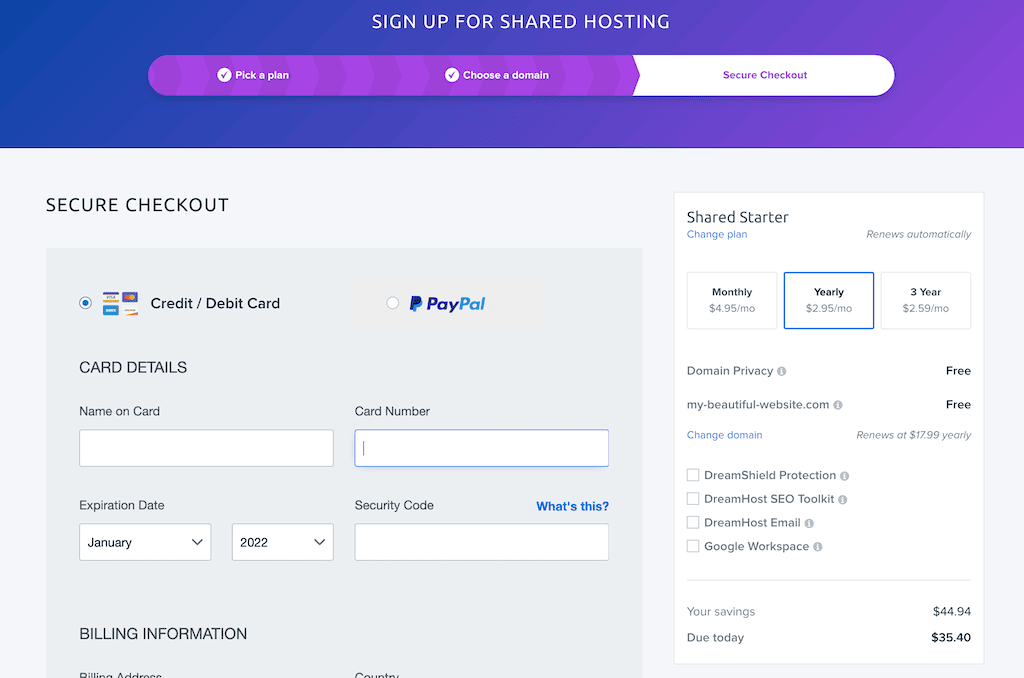
1. Go to Dreamhost and select the Shared Starter hosting plan. The longer you commit, the cheaper it gets. Generally, I would recommend going for the 1-Year option since the saving compared to Monthly is significant.
2. Time to take care of your domain name. If you don’t have a domain name yet, you can now register one by clicking “Register a new domain”. If you already have a domain name, you can connect it to Dreamhost. Or you can skip this step if you haven’t decided on a domain name yet.
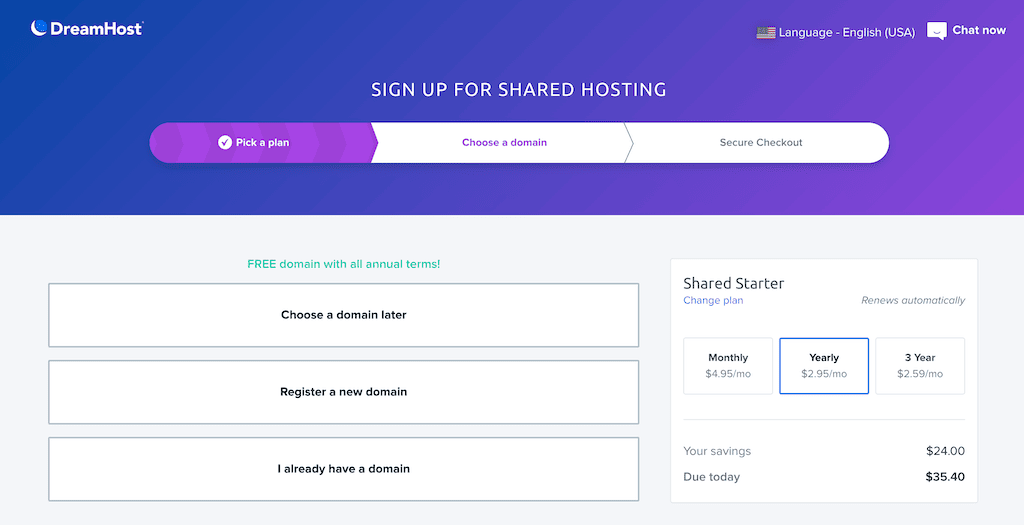
3. Now you are ready to check out. I would recommend deselecting the extra services unless you are sure you need them. You can always add them at a later moment.
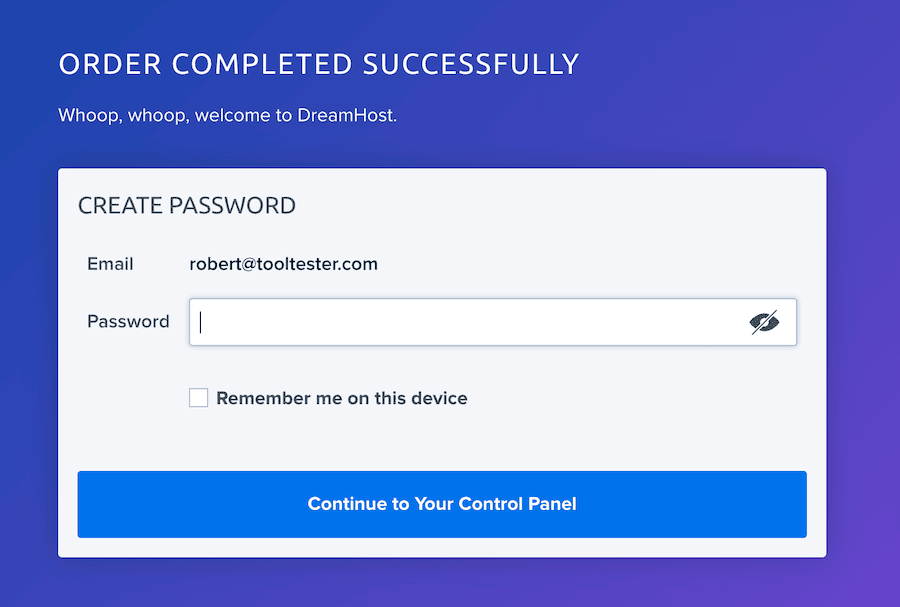
4. Create an account password
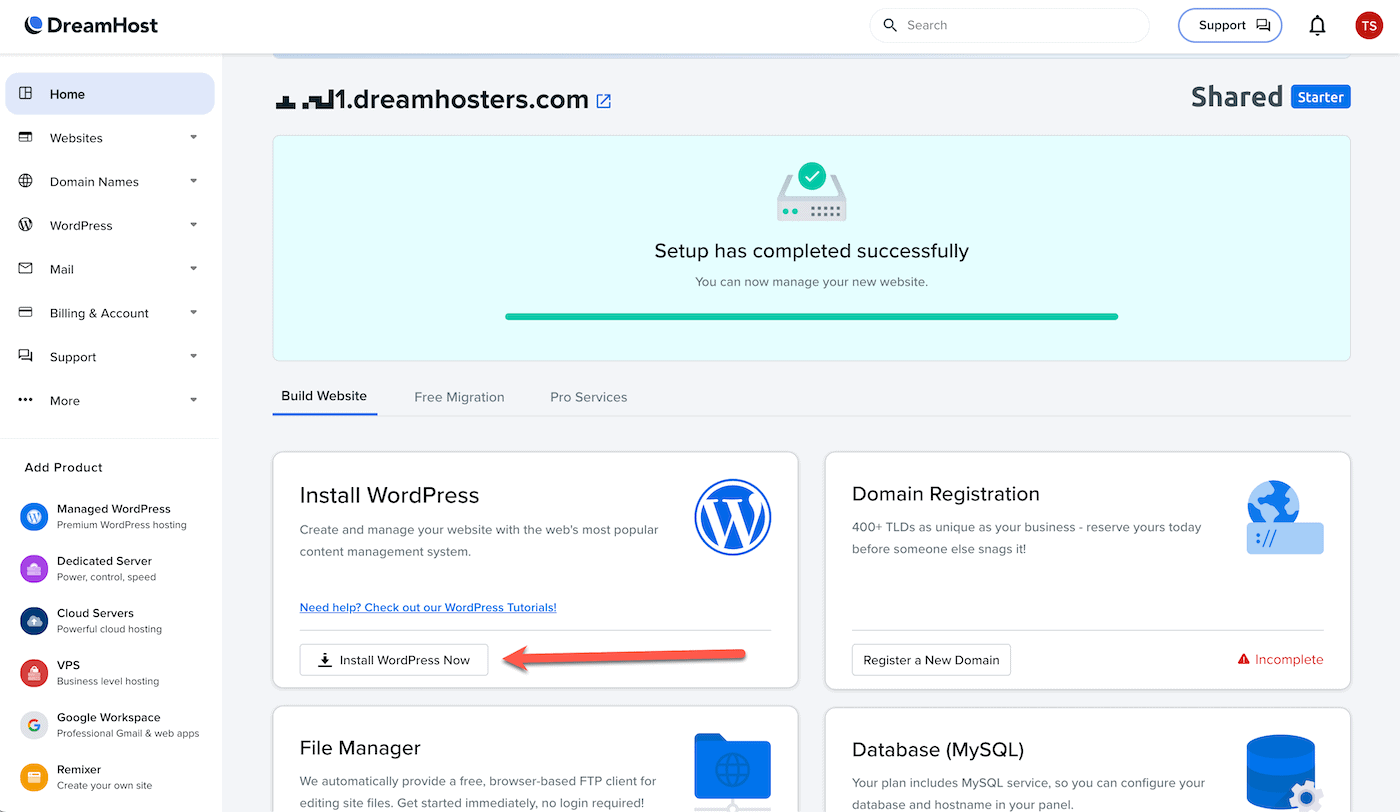
5. Your web hosting account is ready to use. Let’s now create a WordPress website by clicking on “Install WordPress Now”. This will take a few minutes.
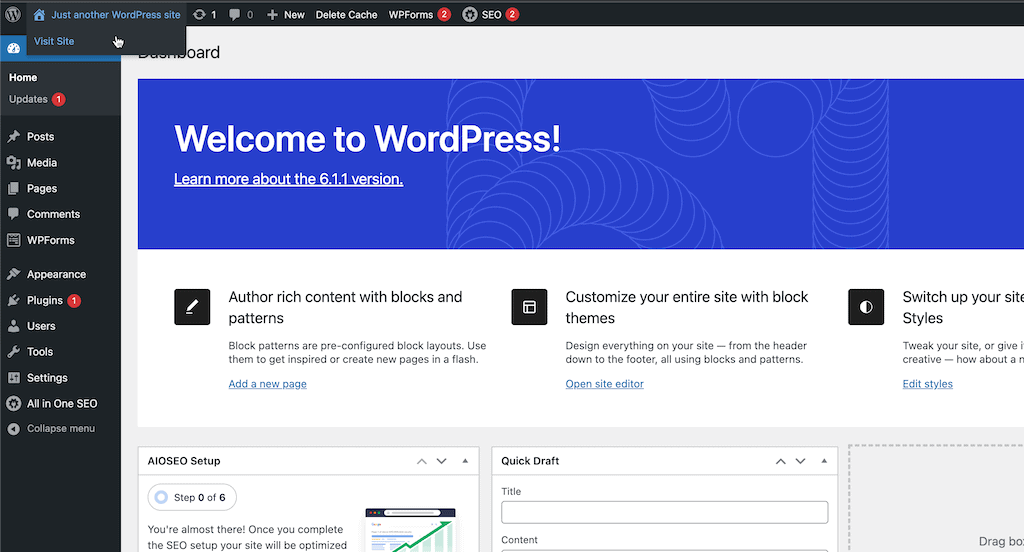
6. Once the installation is complete, click “Open WordPress Editor” and you’ll be taken straight to the WordPress Backend.
Your website is now already live on the web. To see what it looks like, click on “Visit Site”.
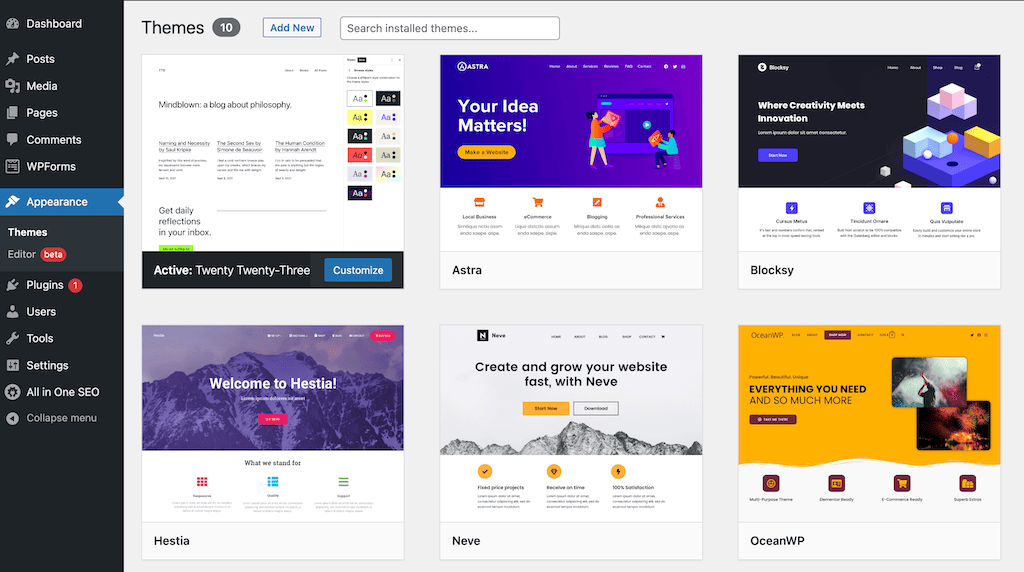
7. The next step is to install a new theme for your website. Go to Appearance > Themes. There are already a few interesting themes pre-installed, but you can also get a new one via the “Add New” button. Each theme will have different customization options.
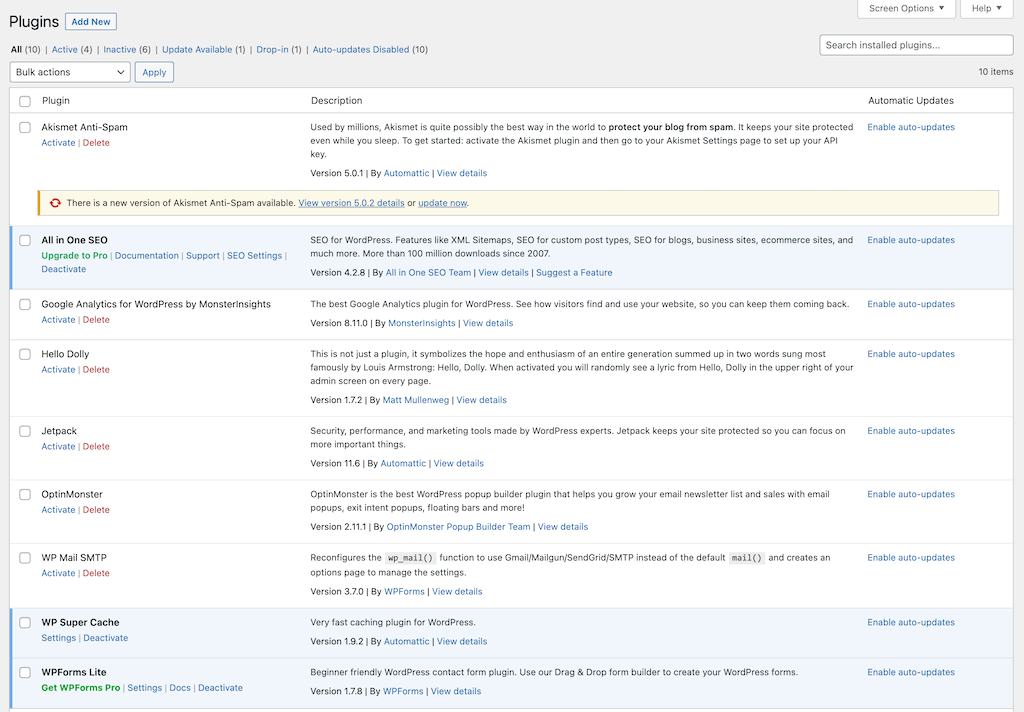
8. Finally, I would recommend taking a look at your plugins. Dreamhost has already installed quite a few plugins.
Note that the ones that say “Activate” are not active and can also be removed if you don’t need them. I would recommend you to use an SEO plugin like All in One SEO, which is already installed. Optinmonster, Jetpack and Hello Dolly can be deleted unless you really want to use them.
My last tip: you need to update WordPress and your Plugins regularly. Otherwise, your website can become insecure. Try to do that at least every two months. You can see when an update is available when there is a warning in yellow (see Akismet below).
All the best for your new WordPress website!
WordPress Themes
To get a customized layout for your use case, you’ll need to install a WordPress theme that matches your vision. Usually, you’ll find a few basic themes when you first log into your new WordPress site.
Fortunately you can find an enormous variety of specific themes for all sorts of industries that can be adjusted and customized. Cheaper themes are available on Themeforest, for example. To increase the chances your theme will be supported for years into the future, it’s important to check its ratings and that the number of sales isn’t too low.
Then there are also premium theme providers such as Astra. They provide a basic free version (mainly to test) as well as premium plans that include customer support and integrations with page builders such as Elementor.
Keep in mind: customizing a WordPress theme can be quite a bit of work. If there is something you don’t like, you’ll often have to modify the CSS or HTML (you or a programmer).
The hosting, domain name, email address, installation and level of support you choose will depend on how much you want to spend and your technical knowledge. It can be quite cheap if you do it yourself. Take a look at our pricing guide for typical website projects here.
Of course, that may not always be the ideal solution, especially when you’re busy running a business. In this case, you can also try to hire a web designer who can help you set up a WordPress website, for example.
Additional website features via plugins
An enormous advantage, especially for WordPress, is that you have thousands of plugins that let you add special features to your website that are not initially included. A typical example would be WooCommerce, a plugin that adds a complete online store.
By default, WordPress is designed to be in a single language, but there are plugins, like WPML, that let you translate the page. Another of my favorites is the Yoast SEO plugin, which lets you change the search engine settings (e.g. to rank higher on Google).
You’ll find more information on WordPress in our WordPress beginners guide.
Option 3: Hire someone to create your website
To speed up the website creation process, you can also hire a web designer or a web agency. You can find these through Upwork, Fiverr and 99designs. The advantage of these platforms is that you can vet your potential contractor by viewing their ratings.
It’s difficult to name a price here, although we outline a few of the costs in our guide to how much a website costs. If you are working with an individual contractor, you can expect $100-200 per page they create for you. For a small portfolio website with 6 pages and some design customization, I would calculate with costs of around $800-1,200.
Hiring an agency is more expensive. The advantage is that you’ll have access to people with different skills (designers, programmers, copywriters and SEO specialists). But since the agency needs to support a whole team, your costs are more likely to start at $1,500 for the portfolio website I described before. Assuming you want them to create a custom design, develop an SEO strategy and do some copywriting, the cost can quickly reach $3,000 or more.
Of course, you will also be able to find cheaper offers, just don’t expect too much customization at a lower price.
Most web designers will typically use WordPress, which is a solid and cost-effective choice. You’ll also need to pay for hosting, but there are plenty of cheap web hosting providers to choose from, which cost around $8-12 per month. Some contractors also put together a package for you where you pay a monthly or yearly fee that already includes web hosting.
We’ve heard too many stories where web designers vanish or agencies hold the website hostage when there are disagreements. Having access to these essential assets enables you to work with a different freelancer or agency if you are unhappy with the previous contractors.
To recap, let’s check out the pros and cons of hiring someone to build your website:
Pros:
- Faster turnaround time
- More professional results with greater customization
- Less distraction from your business
Cons:
- Expensive – not ideal for tight budgets
- Picking the right person or agency can be difficult
- You may not have as much control over the design and content of your website.
Option 4: Program the website yourself
This is the supreme discipline: opening the editor and starting to code. Those who need total liberty will have to make the page themselves. You do need patience for this, and for beginners, it is usually overwhelming (and sometimes frustrating).
A good place to start are websites like Codecademy and W3Schools, which have step-by-step tutorials for beginners. But expect a long journey before your website is ready.
Some popular development tools are NetBeans, Aptana Studio or Brackets. All allow at least HTML, CSS, JavaScript, PHP, and are free. Another option is Webflow, which is a visual source code editor.
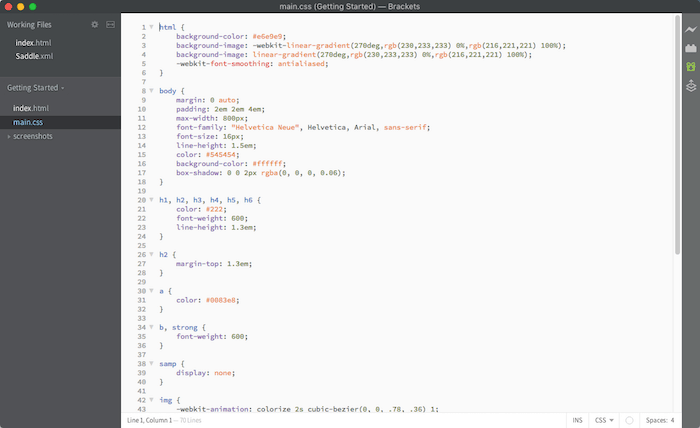
Brackets screenshot
Pros:
- The possibilities are unlimited if you know how to program.
- Cost-friendly web hosting.
- Maximum flexibility.
Cons:
- No support apart from web development forums.
- The learning curve is steep.
- Requires a lot of study and implementation time.
- You might lose interest during the process
3. Register a domain name
A domain name is like the address of a website (e.g. www.mycompany.com), while web hosting is like the physical building where the website is located.
Generally you can register a domain name in two different places: a domain registrar (e.g. Namecheap) or your website builder (e.g. Wix) / web hosting company (e.g. Dreamhost).
Wix and Squarespace, for example, all have a free custom domain name included in the first year. The same is true for Dreamhost and Bluehost.
After the first year they charge slightly more than Namecheap, for example, but the added convenience of only having to deal with one company is normally worth it.
Usually, it’s best to get the .com extension unless you are strictly operating in one country, like Canada (.ca) or the UK (.co.uk). Of course, there are also many successful businesses that use one of the newer domain names like .me or .agency, for example.
![]()
Our own domain name
There is no shortage of registrars that sell custom domain names. We mostly buy them at Namecheap as they are, well, pretty cheap but the differences are not that significant as they range from $9-18 per year.
Let’s now look at an area that is closely connected to the domain name:
How to get a professional email address?
If you’re running a business, you likely don’t want to use a free Gmail or Hotmail address. Having a custom email address on your own domain name looks much more professional! And it’s pretty easy to get. Let me give you a few different options:
- Get it from your website builder or web hosting company: a few of them include email addresses at no extra cost (e.g. Webnode and Siteground)
- Get it from your domain registrar: Namecheap, for example, offers it for less than $12 per email address per year.
- If you love Gmail, you can try Google Workspace. It’s the most feature rich solution, but will set you back $6 per email address. This is also the solution most website builders offer (Wix, Squarespace, Jimdo etc.)
- Tip: For a completely free solution: Zoho Workplace, which includes up to 5 email addresses. It’s a little bit more complicated to set up but your domain registrar should be able to help you with that.
Once all the technical setup is out of the way, you can start focussing on building your website.
4. Plan the structure of your website
Just like it isn’t always a good idea to start cooking without following a recipe, at least if you have no experience, the same goes for creating a website. Here, improvising is not a good idea. Planning will help you decide what sections you need, the content that works best for you and how your website should be designed.
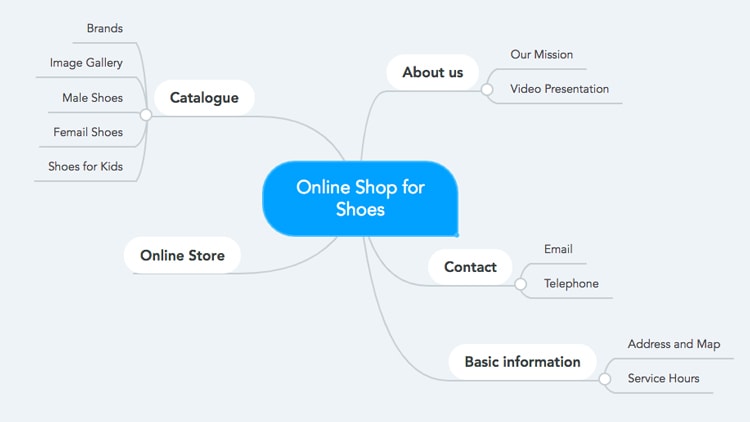
Mind map for an online shoe store
A good way to start is by creating a mind map with the ideas of what your website will need. The main items of this mind map can be used for your website navigation.
Tips for planning your website:
- Use a paper and a pen and write down everything you want on the website. Brainstorming and creating a mind map are the perfect ways to organize your thoughts.
- Take a look at other interesting websites both in terms of design and content. Note what you like and what you don’t.
- Once you have a draft of what you want on your website, ask people you trust what they think. You’ll certainly find some interesting perspectives you can incorporate.
- Create a list (e.g. in Excel) with all the pages that your website will have. Note down the title, what kind of content you’ll have, keywords, the purpose, the kind of page and their importance.
- Bonus: If you want to position yourself well in search engines, this is when you should find out what keyword each page will have, and add them to the list in point 4. Read this SEO guide for more information.
Being too abstract can lead to confusion – for example, I once saw a website that used Who, How and What for the three aforementioned items. Not the most intuitive way to describe it.
Examples of pages that could be important for your business:
- An “about” page on the company and its history
- A page to present services or products
- A contact page (with a contact form)
- A blog with informative and useful articles for your customers
- A calendar of events
- A FAQ or a glossary
5. Choose a theme, customize your design and add your artwork
The way forward is now determined by your choice in step 2 (Decide on a platform).
If you’ve chosen a website builder like Wix, you’ll have a range of templates to choose from. These themes are generally arranged by category (shops, sport, portfolio, blog, etc.).
Once you’ve chosen your favorite template, creating your site is a pretty straightforward affair:
- pick your preferred color scheme and set up the general design
- Set up all pages you require (see step 4 – Planning of a website)
- Customize the copy and images (more on that in step 6).
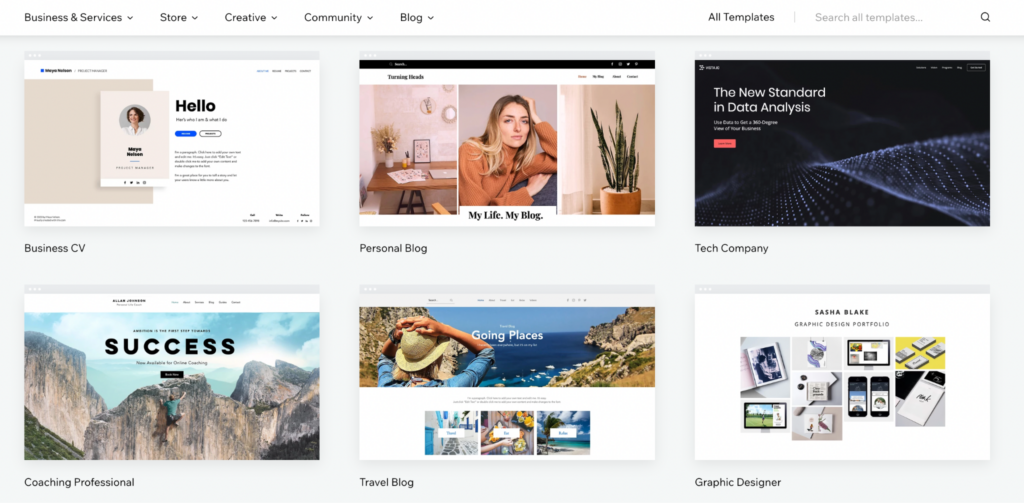
Some of Wix’s templates
Wix is not the only site builder that is equipped with website templates. This is also the case with Squarespace, Hostinger Website Builder as well as Shopify, the best solution for creating larger Ecommerce sites.
If you went for a CMS like WordPress, you will need to choose a theme. There are free and premium ones. We have a dedicated WordPress tutorial that shows you where to get a WordPress theme and how to set it up.
Finally, If you chose to program the website yourself, you will need to create your design yourself or hire a designer and then create the CSS. But this method is generally reserved for companies or individuals who need a bespoke solution and have the right type of budget (or a lot of free time on their hands).
What about the website design?
However you choose to create your website, you will need to make some design decisions.
Creating visual web designs is no easy task. In fact, I’d say that online, there are more examples of terrible designs than good ones. Don’t let your website be one.
Just like bell bottom jeans were stylish in the 70s, they were ridiculous in the 80s and 90s. The same happens with web design. You have to remember that what was considered good practice 5 years ago, can now seem kind of old or out of date. Check out this article to know what practices to avoid.
Here are some tips to make a design your visitors will love:
- Try to use a light (or white) color for the background.
- Choose attractive colors that complement each other. Use Adobe Color if you need help.
- Keep the design clean, simple, and leave white space between the elements. How to make readable text.
- Don’t use too many fonts: one for the titles and another for the text is usually enough. This guide will help you choose.
- Keep consistent style and format. The users should not notice any differences between your pages. Don’t create a Frankenstein.
- Your website should also be perfectly adapted to mobile devices.
- Any images you add must look professional. Don’t upload a selfie you took in front of a bathroom mirror. Keep in mind that today’s smartphones take very nice photos. If you plan right, you can get great headshots.
- Less is more. When in doubt, go minimal.
You can find more design tips in our guide on how to improve a website.
Creating a logo for your website
A logo is crucial to getting that professional look for your website. Similarly to creating your website you can also DIY your logo with a logo maker. Or you outsource the logo creation to a professional designer.
Finding good artwork and images
A website that has only written words on it, looks boring and overwhelming. For that reason you’ll notice that website templates usually have placeholder images on them.
Now, most of the time it’s not a great idea to just keep them as they aren’t really customized to YOUR website.
But there are good alternatives too. Most website builders are connected to stock photo providers such as Unsplash or Creative Commons, which are free or Getty Images / Shutterstock, which are paid premium platforms. This is an easy way to add professional looking photos and illustrations to your website.
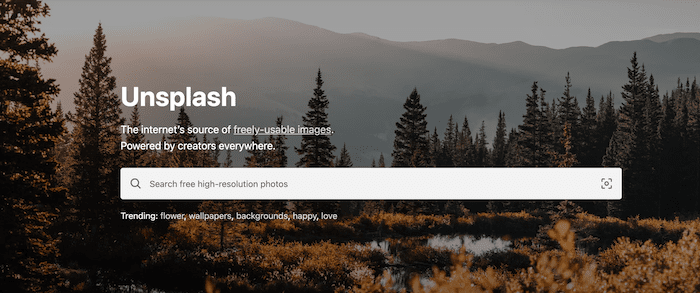
And even if your website builder or CMS is not directly connected to these stock photo providers, you can just directly browse said websites and get the images from there.
What’s more, you can find more professional-looking photos (starting $1) on a lot of other websites, like Depositphotos and Shutterstock. Here are some more free stock photo options.
Using AI to create images is a new option, with ChatGPT and Midjourney being two popular choices. However, I’d exercise caution with these tools, as the images they produce can often appear dull and lifeless. They should soon improve, though!
Make sure you understand the available image formats: .gif, .jpg and .png are the main formats. Plus, you have to optimize the size and quality of the image to the web standard browser. Everything you need to know about this topic can be found in this beginners guide to web graphics.
Although the human eye will hardly recognize any change in the image, it will speed up your website and improve the user experience for your visitors. Of course, search engines love fast loading websites too!
Likewise, it will come in handy to have an editing program to be able to edit and change the size of the images. The most professional ways to manipulate photos are Figma and Photoshop, but not everyone will be able (or will want to) afford them.
Alternatives are Affinity Photo and Acorn, which costs only a fraction of the price of the original and don’t require a subscription.
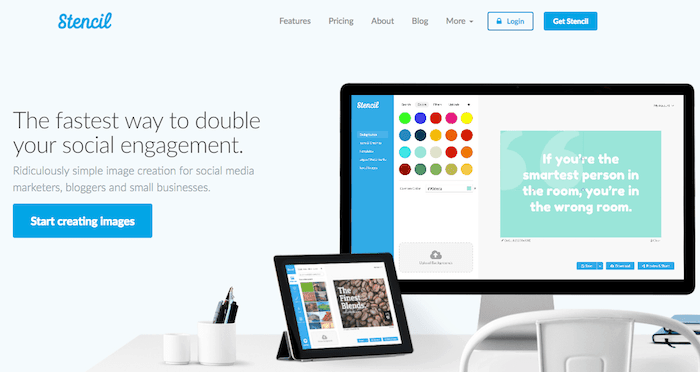
There are increasingly more tools you can use to create graphic resources simply and without having to learn to use Photoshop or Illustrator. For instance, you can use Stencil, Canva or Snappa.
6. Add content and start publishing
After defining the style in the previous step, we are finally ready to add content to our brand-new website.
Speak the language of your customers
Your potential visitors and customers need to be the full focus of your content strategy.
For that reason, you need to speak a language your visitors understand. Remember, they don’t have much time and won’t be happy if you throw cryptic jargon at them. So try to use a clear and simple language without much fluff.
Structuring and optimizing your content
On a website, we are generally less formal than in a book or a letter. We must help the busy visitor find the information they need.
Things you should do:
- Make it scan and skip-able: structure your pages using titles and subtitles because your visitors love to scan the content to skip to the most relevant sections. It feels just as good as skipping YouTube ads and Netflix intros.
- Short sentences with a generous amount of line breaks. This makes it easy to read.
- Bulleted lists: just like this one. Another way to consume content with little effort
- Effective fonts: as mentioned in part 5, our design section, use a reduced number of fonts (max. 2-3 different ones) that are easy to read on screen.
- Own your content: make it clear who is behind the website and generously use photos even if it makes you slightly uncomfortable. Also show relevant qualifications.
Things you should avoid:
- Using complicated language just to sound smart. This will drive visitors away from your website faster than a bullet train.
- Not using call to actions: too many websites lose business because their visitors are unsure of how to get in touch or initiate a transaction. You should make it as easy as possible! Use CTA-buttons, contact forms, online booking tools, live chat. Whatever works for you and your customers.
Find more tips in this article about how to write for the web.
Of course, if writing isn’t your thing, you can also hire a professional copywriter.
Outsourcing content creation
As with all website elements (design, logo etc.), you can hire a copywriting professional to create the copy for your website if you are not a natural-born writer.
The process is usually quite straightforward, you provide a brief, usually via their template, and later once the writer sends their draft you can provide feedback and request any necessary changes.
Top platforms for hiring a copywriter:
- Google search (usually “copywriter [add your industry])
- Upwork
- Fiverr
- Twitter (type your search and then click on ‘People’)
The good thing about copywriters is that they don’t necessarily need to be close to where you are. This job can easily be done remotely. Just make sure you hire a native speaker of whatever language you are going to produce.
7. Promote your website
If you’ve already created your website and published it, you can start promoting and optimizing it to increase visits and improve the overall user experience.
- Update your website: Websites are not books. Once published, they can still be updated. Make sure that you create new and relevant content when you have the chance and that you’re constantly updating the website. For example, imagine a restaurant’s website: if the menu changes, it should be reflected on the website as quickly as possible.
- Online positioning: To attract as many visitors as possible, you’ll have to further optimize your website’s SEO. This is not very complicated, but it requires time and work. Check out this guide for more information on which website builders are good for SEO.
- Web analysis: Your efforts in online positioning (above point) will be useless if you don’t measure your website traffic. That’s how you’ll know whether it’s working or not. The most popular website analysis tool is Google Analytics. And it’s free!
- Once you publish your website, you should register with Google Search Console to notify Google that your page exists and get information. Or at least send your website’s URL (address) to Google so that it can index it.
- Email Marketing: Another common strategy, especially for businesses, is to send regular emails to its visitors, so as not to lose contact. This is especially useful for online stores, small businesses, and bloggers. Email marketing is a science in itself. You can read this how-to guide to find more information on how to get started sending newsletters.
- Social media: Finally, most websites also have social media profiles (e.g. Facebook, Instagram, TikTok, LinkedIn, etc.) for being able to interact with their target group beyond of the realms of their website. This works especially well for visual professionals, like illustrators, jewelers, or photographers.
Final words
Making your own website can be daunting. But with the right platform and some effort, it’s definitely manageable! I hope that this guide has encouraged you to get started.
In addition to this general guide, we also have a couple of industry-specific guides as well:
- Setting up a website for small businesses and entrepreneurs
- How to pick the best website builder for small business
- Guide for starting an ecommerce website
- Website builders for artists and musicians/bands
- How to create an online portfolio
- Creating photography websites
- Create a website with WordPress
If you have any questions on how to start, leave a comment below, and we’ll try to help.
How to Set Up a Website: Frequently Asked Questions
The price for creating a website can vary depending on what option you choose, and how big your project will be. A simple website like an online portfolio that’s built with a website builder will cost you less than a bigger website with a lot of different content and extended features.
If you have a personal project, and aren’t in need of advanced website features or a personalized domain, you can even get free website. Many website builders offer free plans.
For professional projects, you’ll likely need premium features – for example, members areas or online appointment booking – and will therefore have to go for one of the higher pricing plans. A website created with a premium plan can cost you between approx. $5 to $45 per month.
If you have a complex project with very individual needs, a CMS or a self-coded solution is your best bet. In case you are tech-savvy and can handle the installation and maintenance yourself, your running costs will be relatively low. All you’ll be paying for is a domain and hosting provider – the prices for hosting plans start at around $3 per month.
If you hire a web developer who takes care of setting up the website and maintaining it, the costs can be a lot higher and usually ballpark in the hundreds or even thousands of dollars range. However, the good news is that it’s usually only the initial investment that’s that high. Once the website has been developed you will just have to pay for the hosting (and the occasional maintenance of the website by a web developer). So the costs for your website will decline over time.
You can find more detailed information about what a website will cost you here.
There are several ways to make a website. You can use a website builder, a CMS like WordPress, code a website yourself or have it programmed by a web developer.
Which option is best for you depends on several factors, like your level of technical knowledge, the size of your project, your budget, and how much time you have.
Website builders are a suitable tool if you want to create a business website, a portfolio website, a blog, a landing page, or a smaller to mid-sized online store.
For bigger websites and online stores with special requirements, a CMS like WordPress or self-coded solution is usually the better choice.
If you use a website builder for your project, you can usually purchase a domain directly through your provider. Alternatively, you can buy a domain elsewhere and later connect or transfer it to your website. Many website builders allow this option. An affordable domain registrar is Namecheap, for example.
Many times getting your domain with an external service will save you a bit of money; however, buying it directly from your provider is the easier-to-manage alternative.
A little bit 🙂 The good news is that if you have managed to navigate to our website, you will have no trouble using easy-to-use website builders like Wix, Hostinger Website Builder or Weebly.
The easiest site builders like Wix AI or Jimdo even use artificial intelligence to make the website building process as painless as possible for you.
If you have a bigger project and want to use a content management system (CMS) like WordPress, you’ll need some technical skills, as its use requires a bit of programming knowledge (and you’ll need to get a hosting provider and maintain your website yourself). Of course, you could also get the help of a web developer for all that. You can find a developer on platforms like Fiverr or Upwork.
If you want to rank high on Google and be found by potential customers, investing some time into your website’s search engine optimization is crucial.
Important parameters include an SEO title and meta description for your pages and articles, and optimized URLs. They should include keywords that make sense and that your customers are likely to be searching on. You can use tools like ahrefs or SE Ranking to find the most relevant search terms that generate the most traffic.
Other factors, like page speed and the quality of your content, also play an important role.
You can learn more about SEO in this article.
There are several popular ways that you can earn money through your website, and you can even combine them:
- Selling physical products (via delivery or dropshipping, e.g. through AliDropship or Amazon Fulfilment)
- Selling digital products (e.g. online classes, e-books or music)
- Selling subscriptions (e.g. via a membership area)
- Affiliate marketing (implementing affiliate links on your website)
- Adverts (e.g. via Google Ads)
Check out our in-depth article for more ideas on how to turn your website or blog into a revenue stream.
Website builders belong to the family of content management systems (CMS), meaning a website builder is a form of a CMS. However, the main difference is that with a website builder, you get everything in one place – the editor, hosting, domain (if you like), security, and feature updates are provided to you by the website builder provider. Wix and Squarespace are two of the most popular website builders, although there are many excellent website builders that serve a wide range of needs.
If you use a CMS like WordPress, you’ll need to organize a hosting provider and domain yourself, and install plugins and updates manually. You also won’t get the same flexible visual editor you get with a website builder, which may make editing your site slightly more complicated.
A portfolio website is a type of website that you can use to present yourself and/or your work, be it as an individual (for example, if you’re an artist or photographer), a company, or an organization. Its main draw is usually its visual appeal. You can imagine it as a sort of digital business card. Of course, you can also add further functionality, like an online store to sell your artwork, if needed.
You can learn how to put together a portfolio in our guide, and find some portfolio examples for inspiration here.
A landing page is a single webpage designed for a specific marketing purpose. Users click on a link or call-to-action button that you might have implemented in an email newsletter, Instagram/Facebook post, Google ad, or somewhere else on your website, and finally “‘land” on this page.
Generally, with a landing page, you are trying to get website visitors to perform a specific action – to sign up for an ebook, register for a webinar, or trial your product, for example. The goal is to collect the contact details of so-called “leads” to eventually convert them into future customers.
A typical landing page usually contains a call-to-action (e.g. “Sign up for free”) and a method to engage your customers and website visitors. This method can be the implementation of a signup or contact form. It can also be a page with buttons linking to all the services you provide (see the example below), or one with more information about an event that will finally lead the user to an event registration/ticket purchase page.

Wix for example offers special templates for creating landing pages. We also have a list of more conversion-focused landing pages here.
Whatever type of site it is you are creating, you should always have a contact page for your visitors.
Using one of the popular website builders like Wix, Squarespace or GoDaddy, your contact form is just a few clicks away. For a CMS like WordPress you’ll need a plugin, but there are plenty of free ones (e.g. Contact Form 7, Everest Forms).
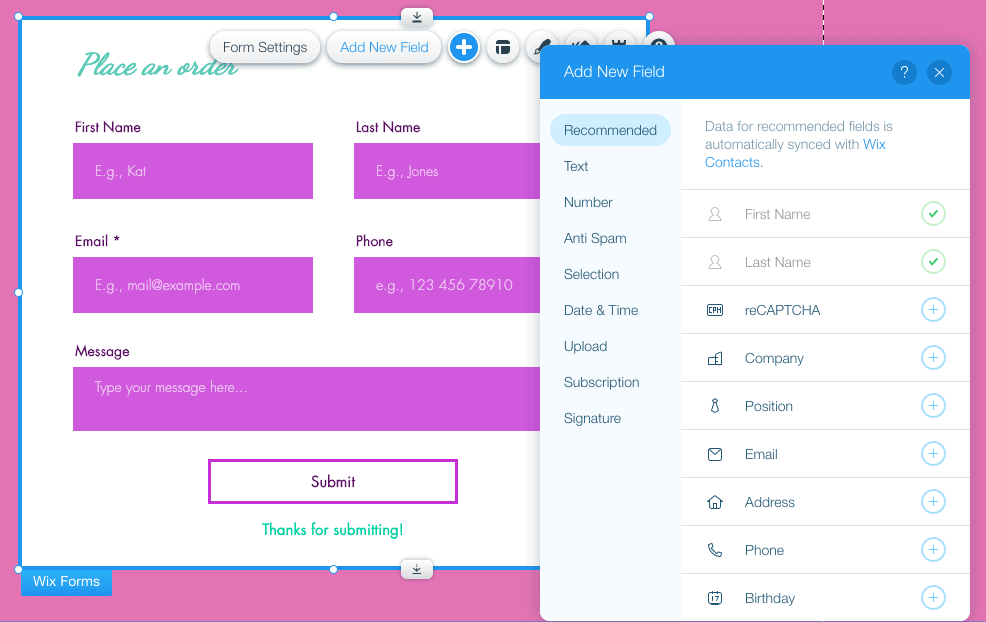
Make sure your contact page is easy to reach. You can add it either to the top menu or your footer menu (or both!).
Of course, you can also add your email address on this page as some people prefer sending messages via their email provider. Do keep in mind, however, that putting your email address on the site for everyone to see, can lead to more spam emails.
Finally, make sure you test your contact form before publishing it on your website!
We keep our content up to date
04 Sep 2023 - Small pricing updates
29 May 2023: Small changes and corrections
13 Jan 2023: Note about copywriting
15 Dec 2022: WordPress step-by-step guide added
14 Dec 2022: Updated content and links
20 Oct 2022: Additional content added
12 Oct 2022: Structure updated
23 Sep 2022: Added FAQ
26 May 2022: Added more information to WordPress section
03 May 2022: A few additions
21 Feb 2022: Added information about different types of websites
13 Oct 2021: Checked for accuracy, email address update
THE BEHIND THE SCENES OF THIS BLOG
This article has been written and researched following a precise methodology.
Our methodology