Tooltester is supported by readers like yourself. We may earn an affiliate commission when you purchase through our links, which enables us to offer our research for free.
Most photographers don’t particularly enjoy the acquisition side of business. This should not come as a surprise – after all, nobody will pay you for the time spent out and about, looking for clients. As a freelancer, customer acquisition via telephone is particularly time-consuming, and can be rough on the nerves, too.
It would be much nicer if potential customers simply found you and contacted you of their own accord. Luckily, a website will do just that. Once it’s up and running, it takes care of the job of finding new clients for you, leaving you to focus on taking beautiful photographs.
Of course, there are a few things you’ll need to do to set up your own website – but this is actually easier than you might think.
In this guide, we’ll explain:
- How to quickly and easily create a photography website using a website builder like Wix, Weebly or Squarespace
- What features to look for when choosing a site builder
- For professional photographers: how to use your website to do client proofing
- How to get found online and attract new clients to your business
Do I need my own photography website?
If you’re in the photography business, there are some pretty compelling reasons for having your own website:
- Build your personal brand: You can stand out by advertising your specialty. Position yourself as the best in a narrow field – much better than being a dime a dozen.
- Contacting you: Your website acts as your central communications hub for any and all requests and inquiries. You can also link your website to all of your social networking profiles.
- “Buy it now” packages and online bookings: Make it convenient for your customers to directly purchase your services on the website. Create standard packages catered to your customers’ needs. The biggest advantage? No more sleepless nights due to customers not paying.
- Digital workflows: let your clients pick and choose your best photos online, digitizing the client proofing process.
- References: Show off the projects you have worked on for other clients.
Can I create a website even without being tech-savvy?
With a website builder (such as Wix or Squarespace), yes! Over the past few years, some excellent solutions have hit the market. Many have been created with photographers in mind, offering professional and stunning templates that can be easily customized.
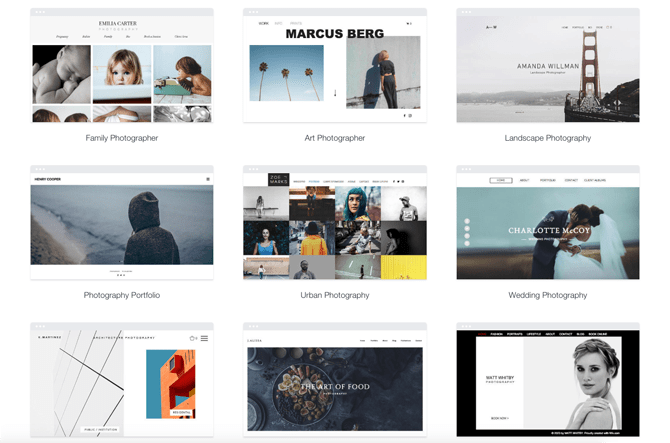
Just a handful of the photography templates available on Wix
The great thing is that most services have a free plan. A free plan usually restricts access to some features, but the parts included are more than sufficient to get to know the software.
For the non-technical users out there – don’t worry, you’re spared the technological details. With a website builder, you won’t need FTP access, or to maintain a database, and you won’t need to deal with a web hosting interface written in IT jibberish. You can also forget about security updates. Content Management Systems like WordPress will require you to do those yourself on a regular basis, but website builders take care of that for you, in the background.
Obviously, this simplicity comes with some constraints. You don’t have access to the same range of professional functionalities and tools that full-blown content management systems offer. But really, most of those features are well beyond the scope of what a simple portfolio website requires anyway.
How to make your photography website: 7 simple steps
You really don’t need a lot to start making your photography website. With just a laptop, an internet connection, and a decent selection of photos, you’ll be set!
Here are the seven steps you’ll need to take – don’t worry, we’ll take you through each one in full detail in the next section:
- Step 1: Create an account with a website builder (find recommendations below)
- Step 2: Pick a template
- Step 3: Customize your site
- Step 4: Add photo galleries
- Step 5: Add extra features (password protection, bookings app, Instagram feed)
- Step 6: Make sure your site will get found
- Step 7: Publish your site!
Take a look at our video to see just how easy it is to create a photography website using a website builder:
Step-by-Step Guide: How to make your photography website
Step 1: Create an account with a website builder
Using a website builder is the easiest, fastest, and often cheapest way to make a great-looking photography website – especially compared to hiring a developer or coding it yourself. So, if you’re set on going down that path, the first step is to sign up for a free account with the website builder of your choice.
If you need some help picking the right website builder, check out our in-depth guide on the best website builders for photographers.
Remember that you can also test out multiple website builders, as most offer either free plans or free trials.
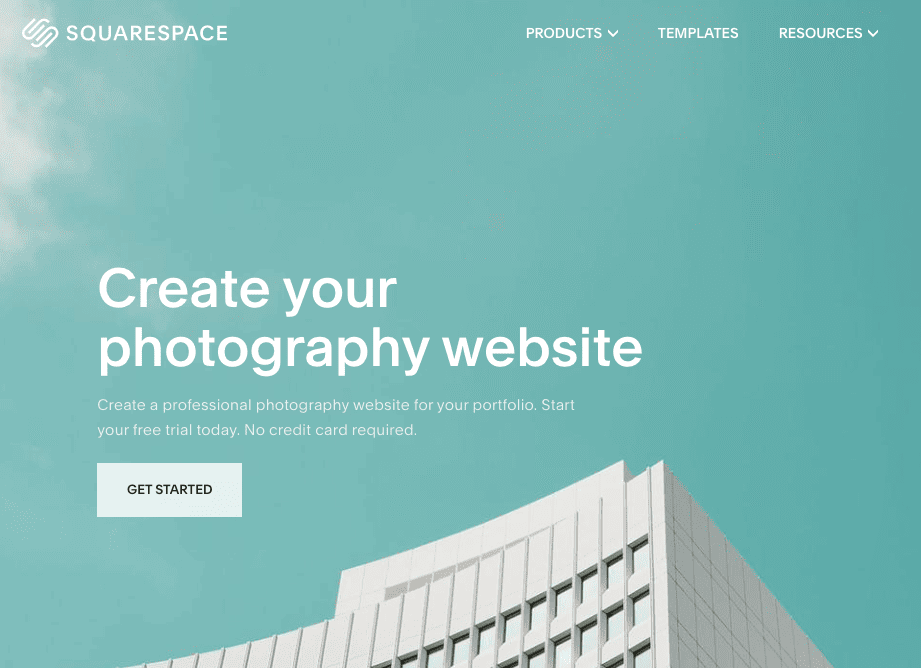
The sign-up process is usually pretty straightforward – just navigate over to the provider’s website (we’ve linked to them in our roundup below), and hit their ‘Sign up’ button. You can’t miss Squarespace’s ‘Get Started’ button, for example:
Here is where you might be asked for your name, email address, and password to create your account (although, depending on the website builder, this might also come later on).
You might also be asked to provide some details about the kind of site you want to create. For instance, Wix lets you specify that you want a photography site, and pick the features you want to enable (don’t worry, you can activate/deactivate these at any time):
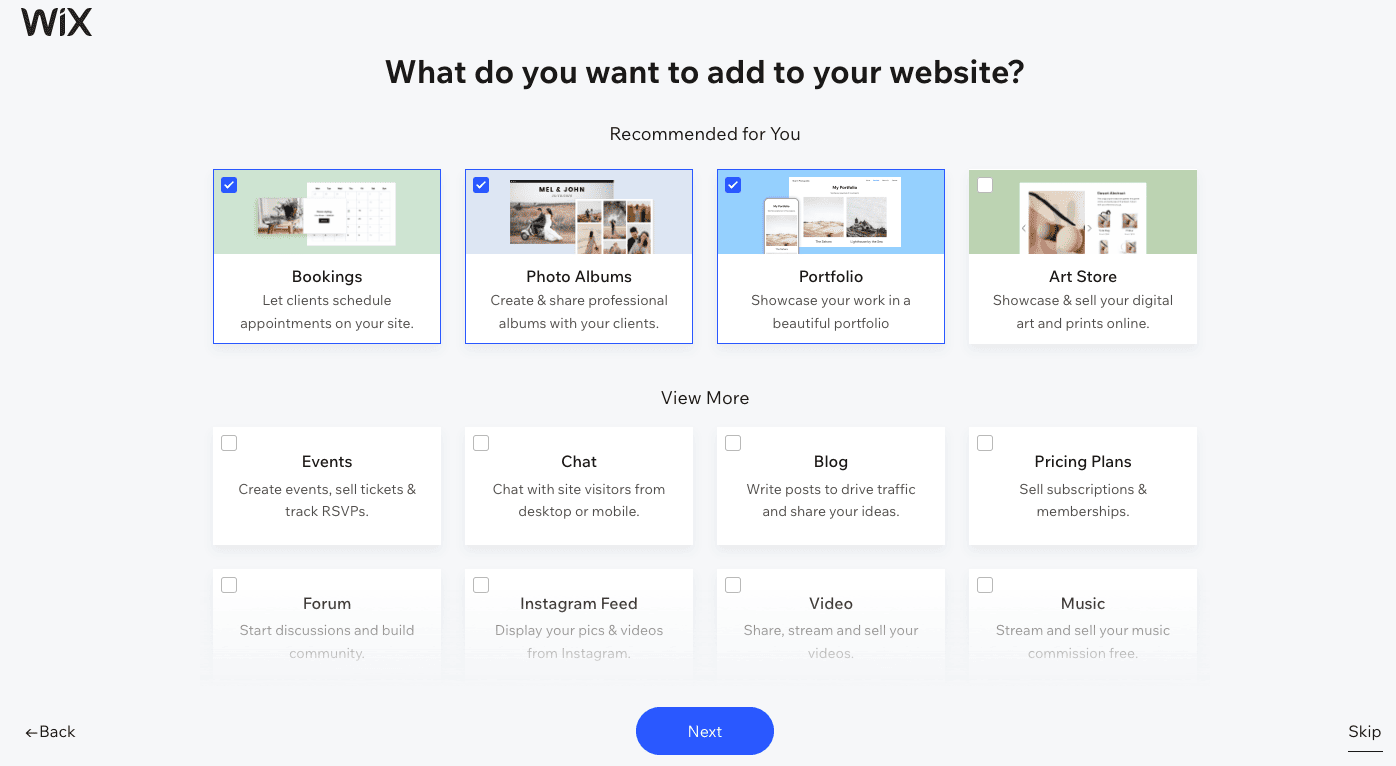
At no point in the sign-up process should you be asked for any credit card details (not if you’re using the website builders on our list, anyway) – right now, the focus is solely on trying out the tool.
In fact, it’s a good idea not to hand over credit card details until you’ve built your site and are sure you want to continue using the tool. Upgrading from a free site will unlock features such as an ad-free site and the ability to use your own domain name, but some providers like Wix will actually let you continue using a free site for as long as you like. This could be a good option if you only need basic portfolio features and don’t plan to sell online.
From there, you’ll be prompted to take the next step…
Step 2: Pick a template
One of the best things about using a website builder is that you don’t have to start from scratch. By picking from one of their templates, you’ll be saving yourself a lot of time, effort, and creative dilemmas!
The designs are usually pretty impressive, too, especially if you’re using a design-centric website builder like Wix, Squarespace, or Pixpa (which specializes in photography websites).
Most of these website builders offer ‘Photography sites’ or ‘Portfolio’ as a template category, so you can very quickly narrow down your choices to find a template with all the features you need. For example, many of Wix’s photography templates come with galleries, portfolio pages, contact forms, and Instagram feeds:

Wix has a huge selection of modern-looking photography website templates
To help you pick the right template, website builders usually let you preview and demo them, so you can see how they would look on a real website. You’ll be able to click around and play with their features. Wix even lets you change the font and color schemes in the Preview mode, which can help you visualize what your final site might look like:

Once you’ve settled on a template, click on the ‘Use this template’ button (or similar). You’ll then be taken to the site editor, where you can start the exciting step of building out your photography website!
Step 3: Customize your site
To really make your photography website your own, website builders let you customize the following elements:
- Content (text, images, animations, etc)
- Style (colors, fonts)
- Layouts (i.e. where content is displayed on a page)
- Navigation (i.e. which pages are included, and how users can get to them)
While your template already comes with text and images, these are just a placeholder for your own content. So, you’ll be able to change each existing element by clicking on it and typing in your own text, or replacing it with your own images.
Some website builders, like Wix, even offer full drag-and-drop functionality, meaning you can place content wherever you like:
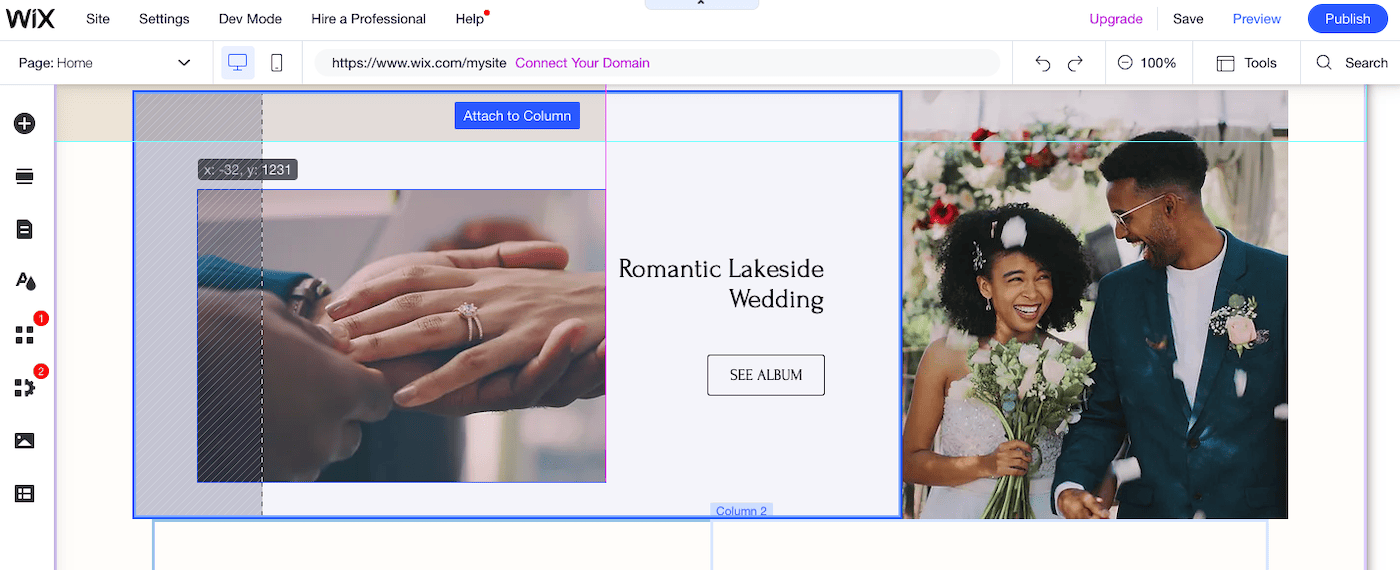
Rearranging content is easy with Wix’s pixel-perfect drag-and-drop editor
But even before taking that step, it helps to have an overall picture of the content you want to include on your site.
The templates give you a good place to start. They usually include pre-built pages that are indispensable to any photography website, and can be easily edited. These usually include:
- Homepage
- About page
- Contact page
- Work / Portfolio
But, you might also think about including pages for the following:
- Services
- Pricing
- Online bookings
- Client galleries
- Blog
Whether or not you’ll need these depend entirely on the type of site you’re trying to make – for example, a portfolio-only website will have completely different features to a website that’s trying to capture new business. Jump forward to this section if you need help determining the features you’ll need.
You can usually add pages by navigating to the main menu and finding the ‘Pages’ section. Here, you’ll be able to see the pages already included in your template. You can deactivate any you don’t need, and also add new pages:
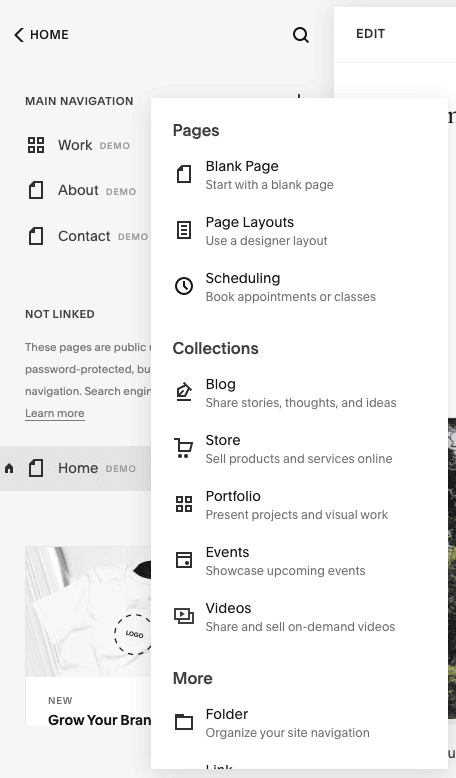
Adding new pages in Squarespace is simple
We’re not going to get into the nitty-gritty of how to edit the pages on your website, as these website builders are generally intuitive enough to figure out on your own. If you do need some extra guidance though, no problem! Here are a few resources you can check out:
> How to make an online portfolio
One thing we would stress, though, is how important it is to set up your contact form and make sure that any submissions go to the right email address. You wouldn’t want to lose potential new business by neglecting this step!
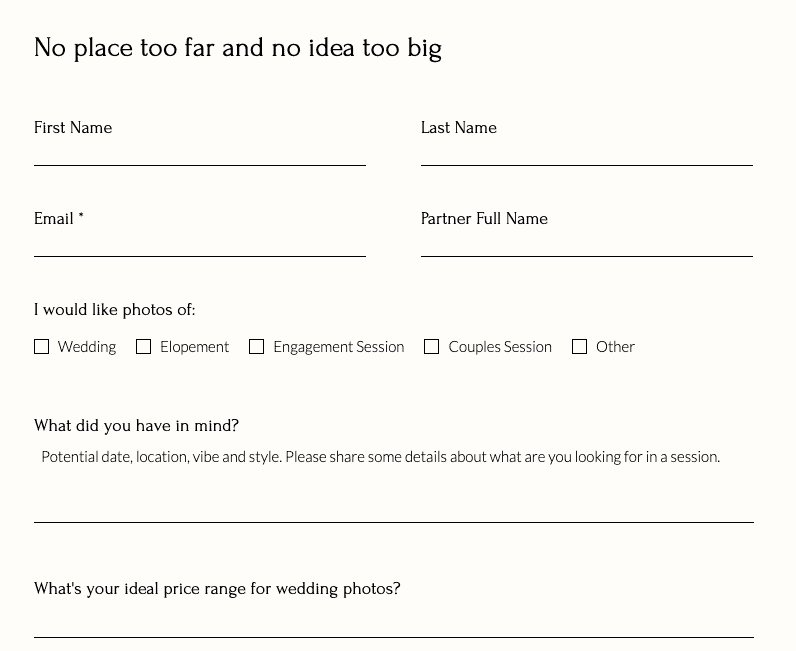
A contact form can help you capture inquiries and customer requirements, as in this Wix example
Step 4: Add photo galleries
Now’s the time to really let your work shine! By uploading your photography and putting it on display, you’ll be able to give visitors an immediate sense of your style – and, hopefully, get those bookings coming in!
Your template probably already has a few placeholder images that you can replace with your own. But if you want to add them in a different format (for example, in a gallery), you can usually do it by clicking the ‘Add content / section’ option, and choosing ‘Images’, as is the case with Squarespace:
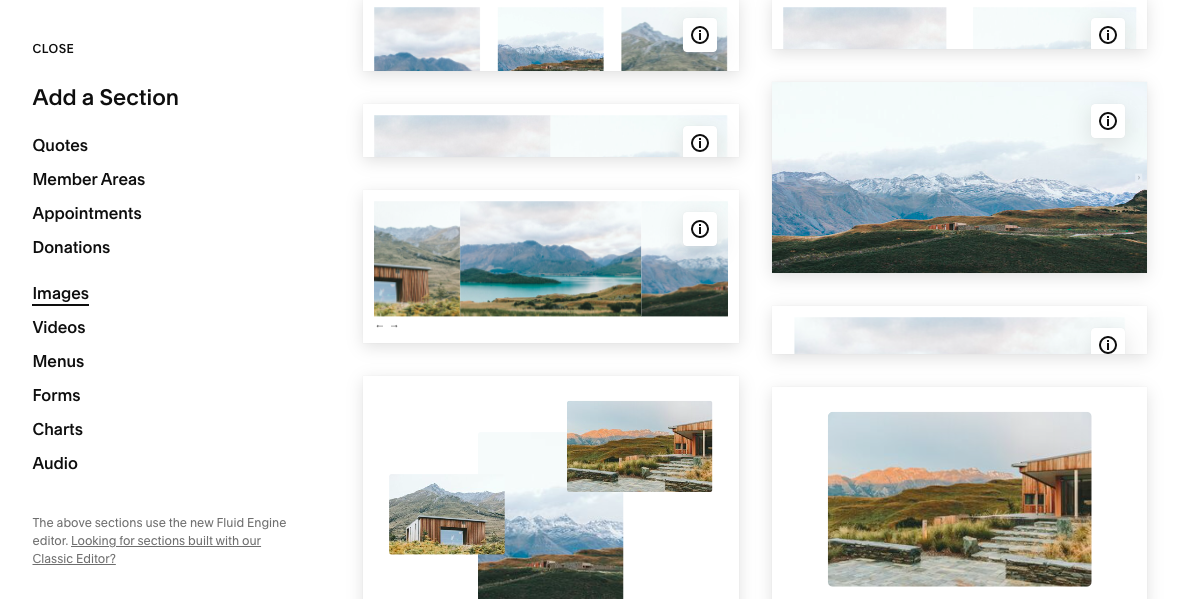
Squarespace lets you choose from a variety of gallery layouts, including full-width, side-by-side, carousels and more
Wix takes a slightly different approach, as you’ll need to enable the Wix Pro Gallery app to add galleries (if it’s not already enabled). We talk more about how apps can add functionality to your site in Step 5, but as you can see, the Wix Pro Gallery app is flexible enough to let you choose from different gallery layouts, and add as many images as you like:
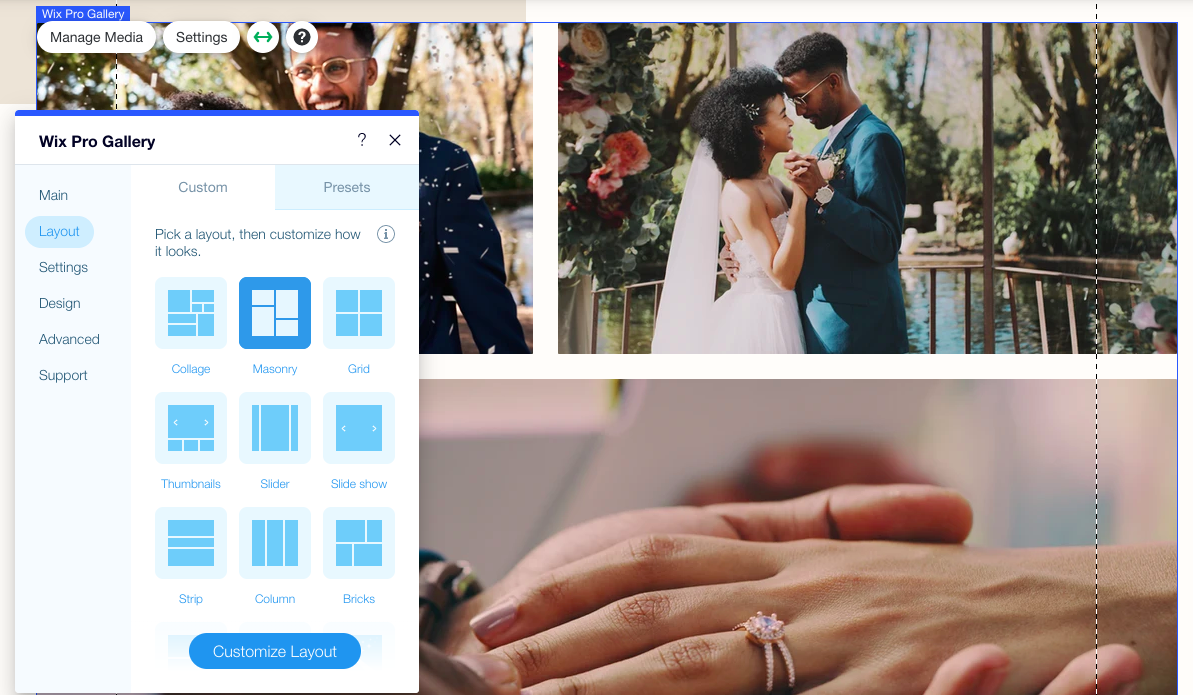
Changing layouts in Wix Pro Gallery
Many website builders also offer portfolio page templates, where you can create a separate page for each project you want to feature. If you’re building a portfolio with Squarespace, you might find our step-by-step tutorial handy:
> How to build a portfolio with Squarespace
Portfolio pages can also be useful if you’re creating client galleries, although be aware that some website builders (like Squarespace) don’t offer comprehensive proofing features.
If you want clients to be able to comment, favorite and download photos, Wix, Pixpa, SmugMug and Format are good picks. The first three even offer print lab fulfillment, in case you want to give customers the option of ordering prints.

Wix’s Album feature lets customers add comments, download images, and even order prints
A few quick tips:
- It’s best not to upload full-resolution images, as these will slow down your site’s loading speeds (which is not great for visitors, or for Google). Instead, make sure to compress your images to an appropriate size and resolution before uploading. Some website builders, like Wix, also give you the option to enable auto-resizing.
- As tempting as it might be, try not to include too many images in a gallery as this can also make your page’s performance sluggish. Instead, it’s better to distribute images across multiple pages. For example, if your portfolio includes wedding and family photography, create separate pages for each category.
- Most website builders offer a decent amount of storage to upload your photos, so you generally don’t need to worry about running out of space. But it’s best to check your plan’s storage limit to keep tabs on this – you can usually upgrade to a higher plan if you need more (which will probably only be the case if you’re uploading videos, or are using your site for cloud storage). Squarespace offers unlimited storage, and Format also has generous allowances for high-resolution images.
- There are also some website builders that offer direct integrations with tools like Adobe Lightroom and Capture One, which can help to simplify the upload process. If this is important to you, check out Format and Pixpa.
Step 5: Add extra features
By this point, your site will probably already be looking pretty polished! If you’re just creating a simple portfolio site, you might even have enough to hit the ‘Publish’ button already (which we’ll cover in a couple of steps).
However, if you’re planning to use your photography website to snap up new business, here are a few tools you might consider adding:
Online booking form
This allows customers to book your services online through a booking calendar. By letting them choose from various services and select a suitable time slot, you’ll remove the need for any tedious back-and-forth when trying to schedule photo shoots and jobs.
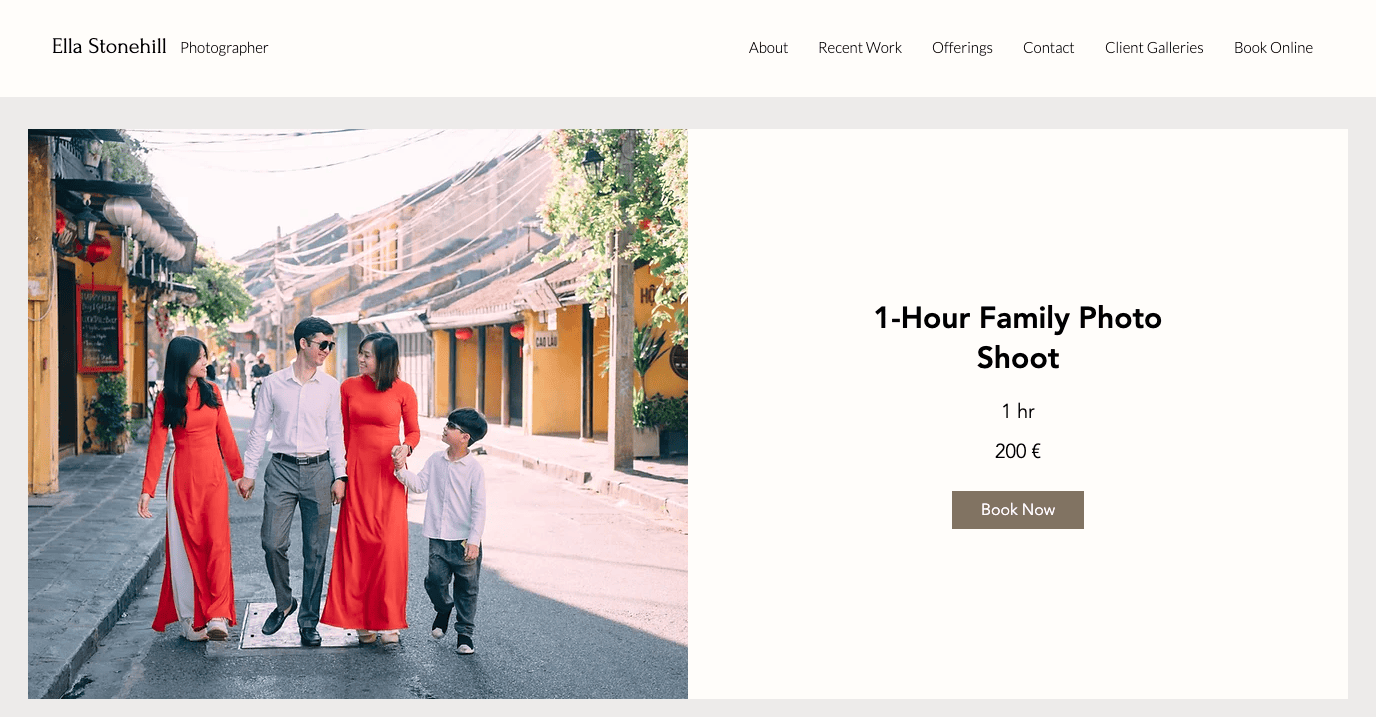
Let customers book appointments and services on your Wix site through Wix Bookings
Wix lets you add a booking calendar for free via the Wix Bookings app (although you’ll need a Business plan in order to accept payments). This can be added by navigating to the Wix App Market, and searching for the tool.
Squarespace also offers its own appointment booking tool, Squarespace Scheduling, which accepts online payments and lets you sell subscriptions, packages, and gift cards. However, this is an additional cost, starting at around $14/month.
Pixpa is another website builder that lets you offer services, and integrate a Google or BookingBug calendar for appointment booking – however, it doesn’t allow customers to pay for these services online.
Online store
Want to sell digital downloads, prints, albums, and other photography products? Any of the website builders on our list will let you add an online store to your site, and take payments via Stripe, Square, Paypal, or other payment methods.
For example, Squarespace lets you sell a wide array of products (digital, physical, services etc.). It also integrates with print-on-demand apps like Printique and Printful to let customers purchase artwork and merchandise directly from your site.
But website builders like Pixpa and SmugMug take it even further. Its partnerships with print labs mean that customers can order personal prints directly from your website. Pixpa even lets you work with a lab of your choice.
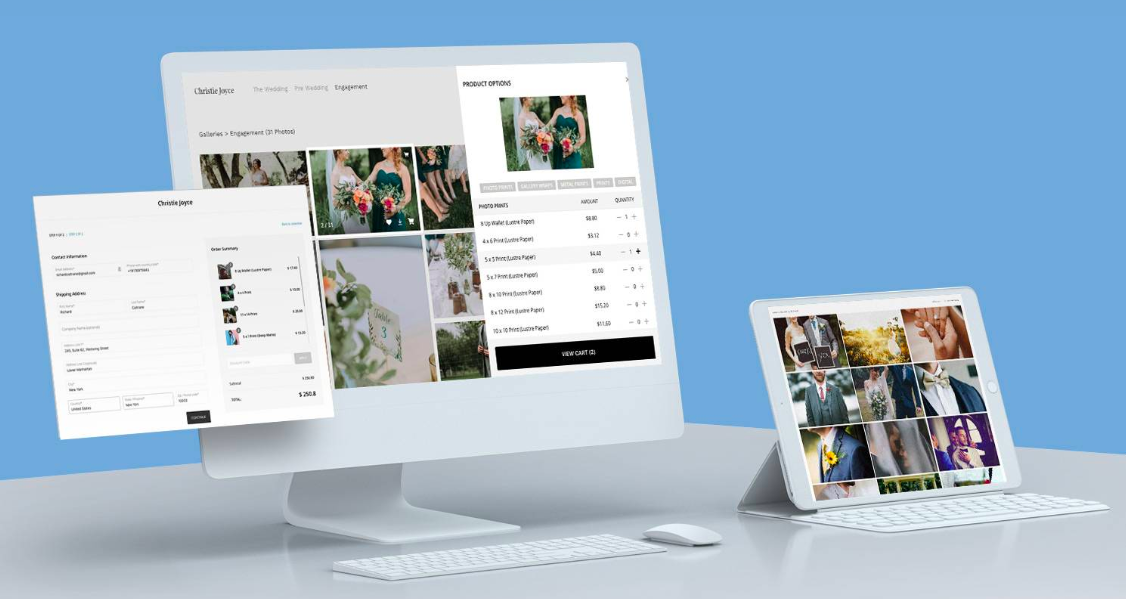
Pixpa offers customers the options to purchase images as downloads or prints, thanks to its print fulfillment feature
Password protection
This feature is important if you want to add private client galleries that can only be accessed by password.
Luckily, it can be easily enabled. Most of the time, it’s just a matter of selecting the password protection option when creating the client gallery, and specifying the password you want to use. 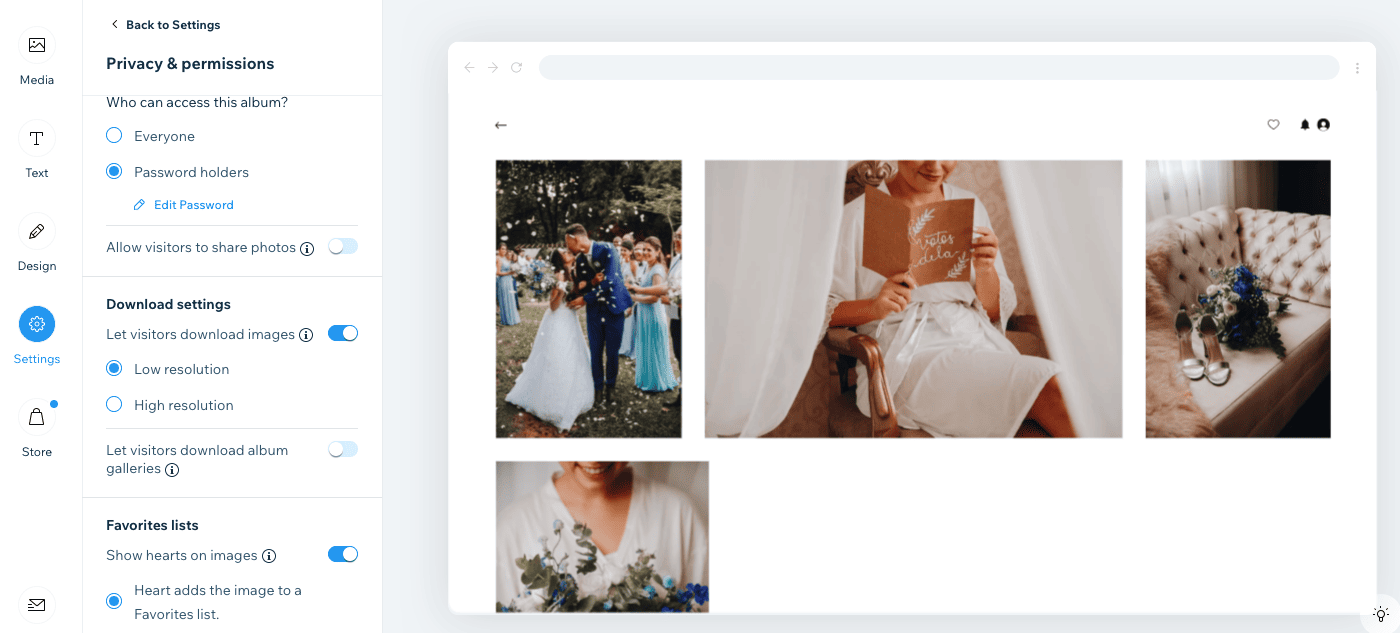
Adding password protection to a Wix photo album
Instagram feed
Instagram is one of the world’s most popular social platforms, with around 1.5 billion users. It’s a novel way to get your work in front of new audiences (and potential clients), and adding an Instagram feed to your site looks great visually.

Austin-based photographer Lisa Woods features her Instagram feed on her Squarespace-built website
Again, this can usually be enabled with just a few clicks. In the case of Wix, all it takes is for you to add it via the Wix App Market (the Instagram Feed app is free), and connect your account. For Squarespace, you’ll need to add it via the ‘Add block’ function in the editor, but it’s just as intuitive as Wix’s process.
Step 6: Make sure your site will get found
Congrats, you now have a stunning website that’s (nearly) ready to publish!
Of course, creating your professional photography website is really just half the battle. After all, what good is a beautiful, state-of-the-art website if there’s nobody visiting it?
What you really want is a site that continuously receives new leads, meaning that potential clients leave their contact details, so you can reach out to them.
That’s why it’s absolutely essential to optimize your website for SEO – it’s your best bet for getting found online, and for drawing new customers to your site.
At Tooltester, we spend a lot of time optimizing our own site for search, so here are our top 5 proven tips for getting that almighty first-page ranking on Google for your photography site:
1. Do your research
A good place to start is by identifying relevant keywords that people are searching for (e.g. ‘wedding photographer’), so that you can tailor your site’s content accordingly. You can use tools like Google Keyword Planner to see search volumes, and get some ideas for keywords. Two rules of thumb when choosing keywords:
- Make sure there’s not a lot of competition for them. By this, we mean both quantity of sites listed for that keyword, and quality (you don’t want to be competing with the likes of National Geographic, for example!)
- The more specific, the better – as long as there’s a good amount of search volume for them. So, ‘commercial photographer in Barcelona’ is much more relevant than ‘commercial photographer’, for example. Which brings us to our next point…
2. Go local
If you’re only looking to serve customers in your local area, you have a much better chance of getting found, as there’s simply less competition than if you were targeting a countrywide or global audience. Register yourself on Google My Business to boost your chances of getting found through organic search or Google Maps. For example, look what happens when we do a search for ‘Auckland photographer’:
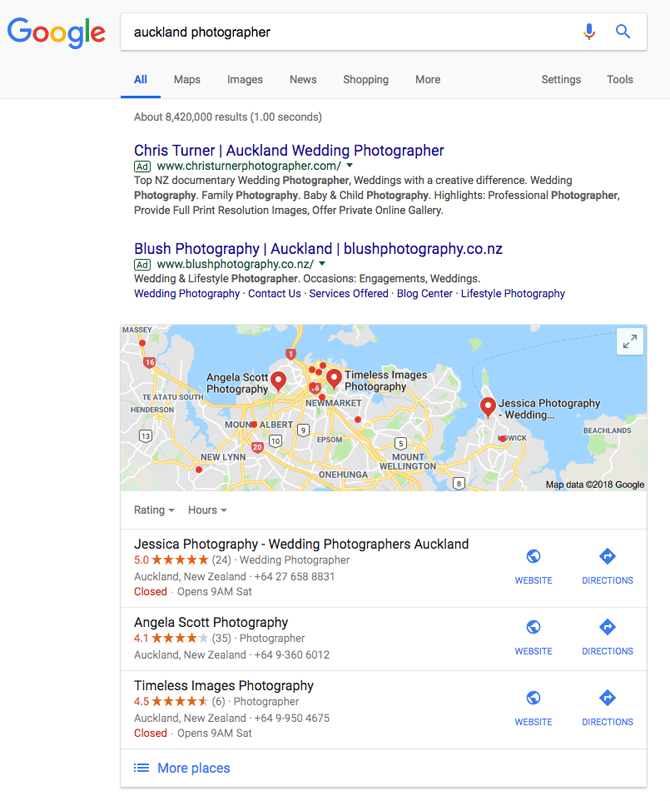
The Google My Business listings are among the first results you see, alongside customer ratings, contact information, and where they’re located on the map. That’s pretty powerful stuff! Moz have some handy tips on optimizing your GMB listing here – they’re well worth checking out.
3. Take your website builder’s lead
All of the featured website builders have inbuilt capabilities to help you optimize for SEO, including the ability to set page titles, add meta descriptions, and edit URLs. So, take full advantage of them! Make sure you optimize each relevant page on your site (there should be one page per keyword you’re targeting).
As you’ll undoubtedly be featuring images, don’t forget to optimize these too by using keyword-appropriate file names, adding captions, and assigning alt tags (the alternative text that displays if your image doesn’t load).
For more tips on good practice for optimization, check out our SEO article.
4. Reduce image file sizes
Page loading speed is an important factor in determining search rankings. Large files (such as high-resolution images) slow a site down, so it’s always better to use compressed images. Luckily, all of the above website builders (apart from SmugMug) apply some form of compression to your images. Pixpa take this a step further by allowing you to specify if and how much you want to compress your images. Using a service like tinypng.com, you can always reduce your photo’s sizes even further.
Of course, this also affects video. If you’re planning to feature your videos on your site, you’ll want these to load as quickly as possible, so usually it’s better to embed files using an external player like YouTube or Vimeo.
5. Get backlinks to your site
This is perhaps the most difficult (and most mystifying) part of the whole SEO process. Google’s theory is that, if your site is really relevant to a topic, there will be other websites linking to you when they talk about their topic. It makes sense – but how do you get other sites to link to you in the first place?
Well, there are actually a lot of things you can do, depending on how much effort you’re willing to put in. Generally, the most effective way is by publishing regular, up-to-date content (e.g. on your blog). You can then promote this through channels like social media and email newsletters, as a way to get traffic (and potential linking sources) to your site.
I would start with partners and clients as it’ll be easiest to convince them to link to your website, since you have a personal relationship with them. If you’ve got the time, you can also do some link building outreach, which involves contacting other relevant sites with a strong reason for why they should link to your site. This obviously takes a lot of research and effort.
7. Publish your site
Okay, we know you’re itching to hit that ‘Publish’ button, but before that, make sure to do a final check of your site. You can usually do that using the ‘Preview’ function. Wix’s, for example, lets you preview both the desktop and mobile versions of your site:

Wix’s mobile preview mode
Once you’re happy that everything looks and works as it should, go ahead and hit ‘Publish’! You’ll be given a free temporary domain name at first, but if you want to connect your own domain, you’ll also have the option of doing so. Find out how to connect a domain with Wix here, and with Squarespace here.
What features do I need for my photography website?
Typically, photographers look for the following features when creating their website. You may or may not need all of these, but if you’re planning to generate business through your site, they’re definitely worth considering:
- The site can be updated without any programming skills
- Relatively small site (about 5 to 30 pages)
- Attractive design templates (optimized for mobile devices)
- Elegant ways to present your portfolio
- Different photo gallery options
- Plenty of storage space for high-quality image files
- Social media integration (e.g. Facebook, Instagram, Pinterest,…)
- Blog
- Contact page
- Appointment scheduling via website
- Option for password-protected client access (for private galleries) and also client proofing
- Domain name and email account included
- Possibility to optimize for search engines (SEO)
- Technical support offered by the provider
- Cost: $8-20 per month, between $25-40 with e-commerce
You probably don’t need
- Ability to manage hundreds of individual pages
- A big multilingual website or store
- A paid membership area (although it’s not too difficult to create one)
Sounds like a pretty exhaustive list – but luckily, you’ll find most (if not all) of these features in the website builders we discuss below.
What are the best website builders for photography?
Here’s a quick summary of the top website builders we recommend for photography sites.
Tip: find an even more detailed article about the best website builder for photographers here.

Wix: Made to Impress
Without a doubt, Wix offers the most sophisticated designs and image galleries available from website builders today. That is the very reason why it has become so popular with anyone who wants to showcase a photography portfolio. As you were able to see in the video earlier, it’s extremely flexible and allows for pixel-perfect designs.
What’s also worth noting is their App Market. It offers an unmatched array of additional features that you can activate with only a few clicks. Wix Bookings is a noteworthy app as it will allow your clients to book appointments with you directly online. It even syncs with Google Calendar.
Wix has a very decent blogging feature that’ll help you write about your passion for photography. If you are interested in selling your work, you should also check out Wix’s online store.
Finally, Wix also allows you to create private client galleries, complete with proofing features (comments, favorites, downloads etc).
Pricing begins at $17 per month for the Light plan, which offers an ad-free website with a custom domain. If you wish to incorporate ecommerce features on your website, consider upgrading to the Core plan at $29 per month. With this, you can sell both physical and digital products, as well as services.
What we like: their ease of use, their photography templates, and the great variety of galleries. It’s also handy that you can let your clients book you online and sell your photos through your website! Thanks to the SEO Wiz you’ll get useful tips to optimize your website for search engines.
What they should improve: Unlike many other website builders, they don’t offer unlimited storage, which you might find limiting if you’re storing full-resolution images. Also, Wix sites aren’t mobile-friendly by default, so some manual tweaking usually needs to be done. Prices are also higher than with other site builders.
Overall, we think that it’s a fantastic choice for photographers, as its visual appeal is simply unmatched. Learn more in our full Wix review.

Pixpa: Built for professional photographers
Pixpa market themselves as the website builder for creatives. It’s a claim they’re able to back up, with hundreds of real-life photography and design websites featured on their site. Their wide customer base isn’t surprising, given their top-notch range of beautifully-styled themes (which look very similar to Squarespace’s, another well-known website builder that’s popular with photographers and artists).
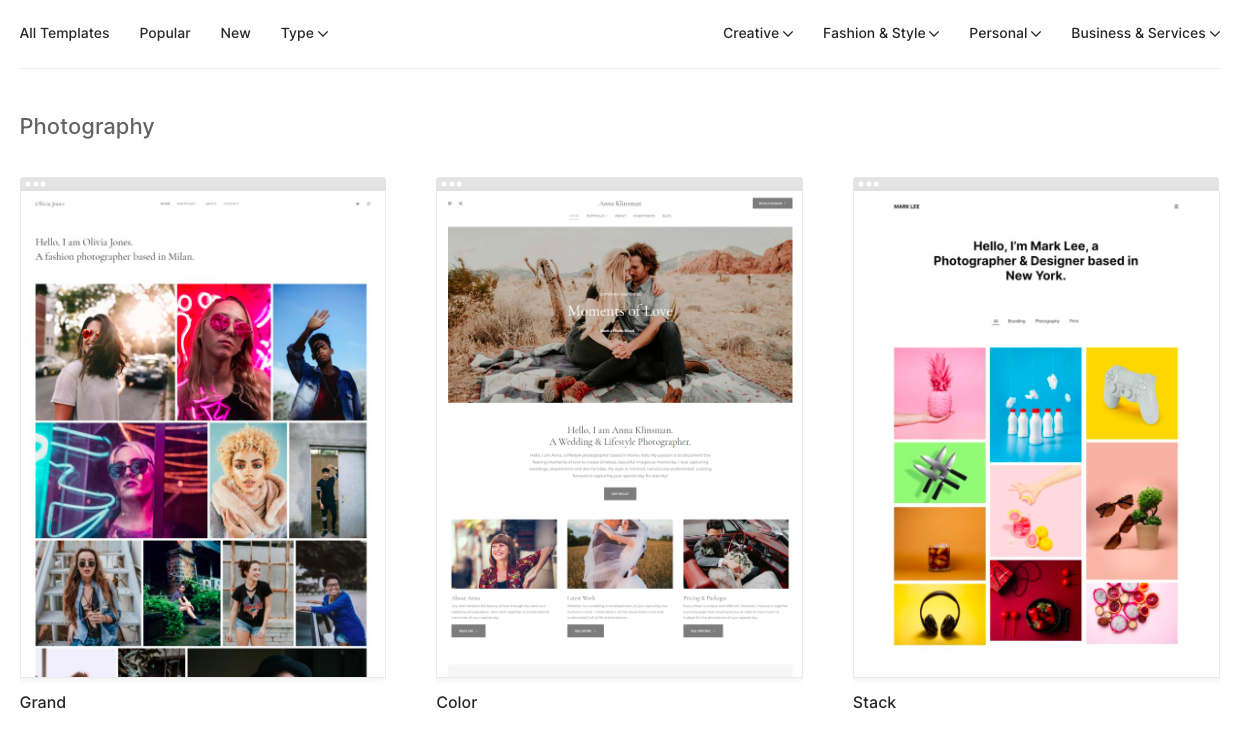
Pixpa’s templates
A few features really stand out with Pixpa. One is their Proofing feature, which allows you to set up private collections that can be shared with clients. Clients can also provide feedback, download or purchase images. 3GB of proofing storage is already included in the Creator plan for $12 per month.
If you don’t need many features and can live with only 5 pages, there is also the Basic plan that starts at only $6 per month.
Another Pixpa highlight is the ability to set up an online store, which is available on the Creator plan (+ above) and is commission-free.
They also have plenty of SEO-friendly features, including the ability to edit metadata for each page, and optimize images.
In terms of visual customization, you have a flexible grid-based editor that is also similar to Squarespace’s, and lets you add in content blocks (e.g. galleries, testimonials, contact forms). HTML and CSS editing are possible too.
What we like: the client proofing feature is unique, their beautiful templates and the ability to control image compression on upload and use of IPTC data. Support via live chat was very helpful and fast to respond.
What we don’t like: no free plan. We’d also like to see it include an appointment booking tool.
Tip: to get an exclusive discount for your first year use the discount code websitetooltester10

Format: VIP Features for Photographers
Although Format.com used to cater to a broader range of creative industries, they’ve now put photographers at the front and center of what they do. As a result, their website creator comes packed with impressive features such as client galleries, watermarking, proofing, and integrations with Adobe Lightroom and Capture One. They even offer an online Masterclass if you need a little bit of extra help with the business side of things.
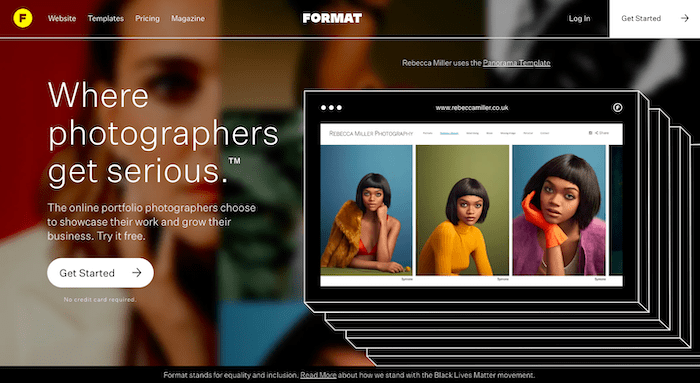
In fact, Format’s feature list is pretty similar to Pixpa’s. You’ve got 70+ polished templates to choose from (all mobile-friendly), which for the most part are easy to customize and edit, as long as you’re not looking to radically change-up the layout. And if you are, Format’s higher-level plans allow for CSS and HTML editing.
They also offer a perfectly adequate blogging feature, SEO customization options, and an online store. But here’s where they start to fall a little short. The store offers zero integration with your client galleries – no options to sell images as prints, for example. As a result, Format’s proofing features are limited to allowing clients to ‘favourite’ or download images – they won’t be able to order selected images through your site.
Format’s pricing also puts them at the more ‘premium’ end of photography website builders. While they try to justify this with VIP features such as the Masterclass and a bespoke site-building service, it’s something to keep in mind when you consider that providers like Wix and Pixpa offer a more comprehensive list of features and integrations, for a lower monthly price.
What we like: The plug-ins for Adobe Lightroom and Capture One are a real differentiator, allowing you to export images directly to your website’s galleries. They also offer a free plan for up to 10 client galleries. We also like their business-oriented features, including CRM (customer relationship manager) and online store (for generic products).
What they should improve: Their proofing feature is useful, but is really limited by the fact that they don’t allow customers to order prints. Certain ‘advanced’ features such as ecommerce and mailing lists are only available on the higher-level plans. It’d also be great to see a wider range of integrations with other tools (email marketing services, e-commerce etc).
Tip: Get 10% off using voucher code WEBSITETOOLTESTER10

Squarespace: Great Solution for Bloggers
Squarespace is slightly more expensive, but in return offers a very good blogging feature. You can also use Squarespace to sell digital and physical products (thanks to its print-on-demand integrations). Keep in mind though that it’s not quite as easy to use as the previously mentioned website builders. Also is it nowhere nearly as flexible as Wix, for example.
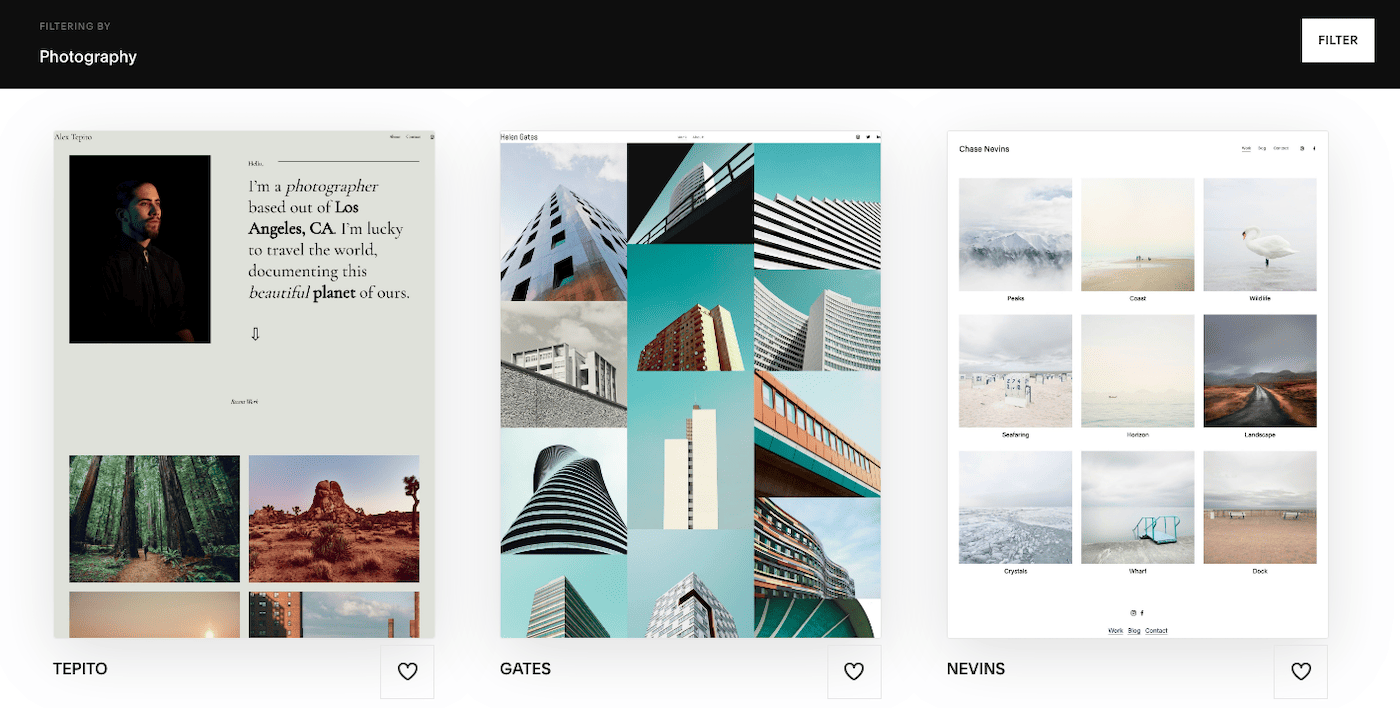
Squarespace is one of the few site builders that offers responsive templates, i.e. they will always automatically adapt their size to mobile devices. Unfortunately their page speed is a bit on the slow side. Find out more in our detailed Squarespace review.
What we like: Squarespace’s bold templates definitely have an artistic quality about them, helping to give your site some serious design cred without too much effort. Its portfolio pages are also well-designed and can help make your work stand out. You get unlimited storage on all plans, and also a flexible ecommerce builder that lets you display all the content you want on your product pages.
What they should improve: While you can password-protect pages to create private client galleries, Squarespace doesn’t offer any client proofing features or the ability for clients to order gallery prints. Faster page loading speeds would also make for a better user experience.

SmugMug: Show Off Your Entire Portfolio
SmugMug has a clear focus on photography portfolios. Thanks to unlimited web storage in all plans you can create a complete archive of your images. Creating a good-looking website, on the other hand, might take a bit of effort. They sport a couple of great templates, however, adjusting them can be tedious.
Prices start at around $13 per month. Unfortunately, you only get client proofing features on the Pro plan, which costs $42/month! But, it does offer some advanced features for photographers – image editing, watermarks, print-on-demand, and dynamically-created galleries (e.g. for creating collections or a stock photo site).

Weebly: Ease of Use Like No Other
Weebly is the perfect website editor if you don’t want to deal with a lot of technical details. Everything is very beginner-friendly yet powerful at the same time. Their themes are responsive and will display perfectly on mobile devices like smartphones, iPads, and other tablets. Though compared to Wix, they are not quite as cutting-edge regarding their aesthetics.
Weebly is also the only provider we know of that has a built-in video and audio player. If you combine that with the membership feature, you can even show exclusive content to your VIP clients. Lastly, there is also a powerful online store module that you can use to sell your photos.
One thing to note, though, is that Weebly haven’t updated their product in a while. We’re not sure what the future holds for them but we’d really only recommend them for the most basic portfolio sites.
What we like: Weebly’s ease of use and their membership module
What they should improve: their current selection of photography templates leaves room to be desired. Also they don’t have the same bandwidth of galleries. It’s also a shame that they’re lagging so far behind their competitors in the new feature department.
Find out more in our Weebly review.
For More Sophisticated Websites
If you think don’t think any of these site builders will match your requirements, there is also WordPress.org (see our full tutorial here). It’s a more high-end solution that has a much steeper learning curve than the above website builders. But if you are after sophisticated e-commerce with WooCommerce, advanced blogging or paid membership features for your clients, it may well be worth getting your head around it.
Conclusion
Whether you take up the task of creating your photography website yourself or find a web designer is completely up to you. But you’ll find that doing the work yourself is a lot less expensive. And in the long run, being able to make your own changes will also save you a lot of time and money.
As we’ve shown you, with Wix and Pixpa there are some decent options for creating your own professional-looking photography site. And as many of the website builders offer free plans, there’s virtually no risk in trying them out. With any luck, you might find that you can build a fully-functional site that perfectly showcases your art.
After all, if clothes make the man, then images make the website. Luckily, that’s exactly your area of expertise.
Should you have any questions or feedback regarding this article, please don’t hesitate to leave a comment!
We keep our content up to date
14 Sep 2023 – Pricing updates
23 Nov 2022 – General updates, added detailed step-by-step guide
3 Jan 2022 – Verified for accuracy, smaller updates
THE BEHIND THE SCENES OF THIS REVIEW
This article has been written and researched following a precise methodology.
Our methodology


